
Rhinoplasty Revision
Price upon consultation
Revision surgery to correct deformation/complications/dissatisfaction after rhinoplasty
Surgery Overview
AI-generated information for reference only. Please consult a doctor for accurate, personalized advice.
01 Autologous Rib Cartilage Rhinoplasty Revision
Stronger and safer,
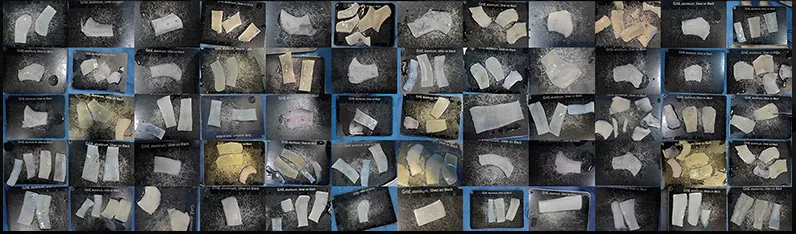
* Photo of Autologous Rib Cartilage harvested during an actual procedure at our clinic.
Chief Medical Director Kim Jin-seong with over 25 years of experience
JT YOUTUBE
Accurate plastic surgery information through videos
JT Autologous Rib Cartilage Rhinoplasty Revision
If you want to reinforce the support structure and achieve a nasal tip with minimal deformation during revision rhinoplasty, when repeated surgeries have weakened the support structure and caused structural problems, Autologous Rib Cartilage Rhinoplasty Revision may be considered.
Rib Cartilage refers to the cartilaginous portion at the end of the rib. Autologous Rib Cartilage Rhinoplasty Revision is a surgical method that harvests the patient’s own Rib Cartilage for use as support and cartilage grafts needed for rhinoplasty.
At our clinic, we mainly use the 7th or 8th Rib Cartilage for revision surgery, taking into consideration nasal tip stability and long-term durability.
✓ Surgery time: approximately 4 hours
✓ Anesthesia: sedation or general anesthesia
✓ Hospitalization: not required
✓ Suture removal: approximately 7 days later; approximately 14 days later for the rib harvest site
✓ Follow-up visits: approximately 2–3 times
✓ Return to daily activities: approximately 7–14 days later
Why We Recommend Autologous Rib Cartilage for Rhinoplasty Revision
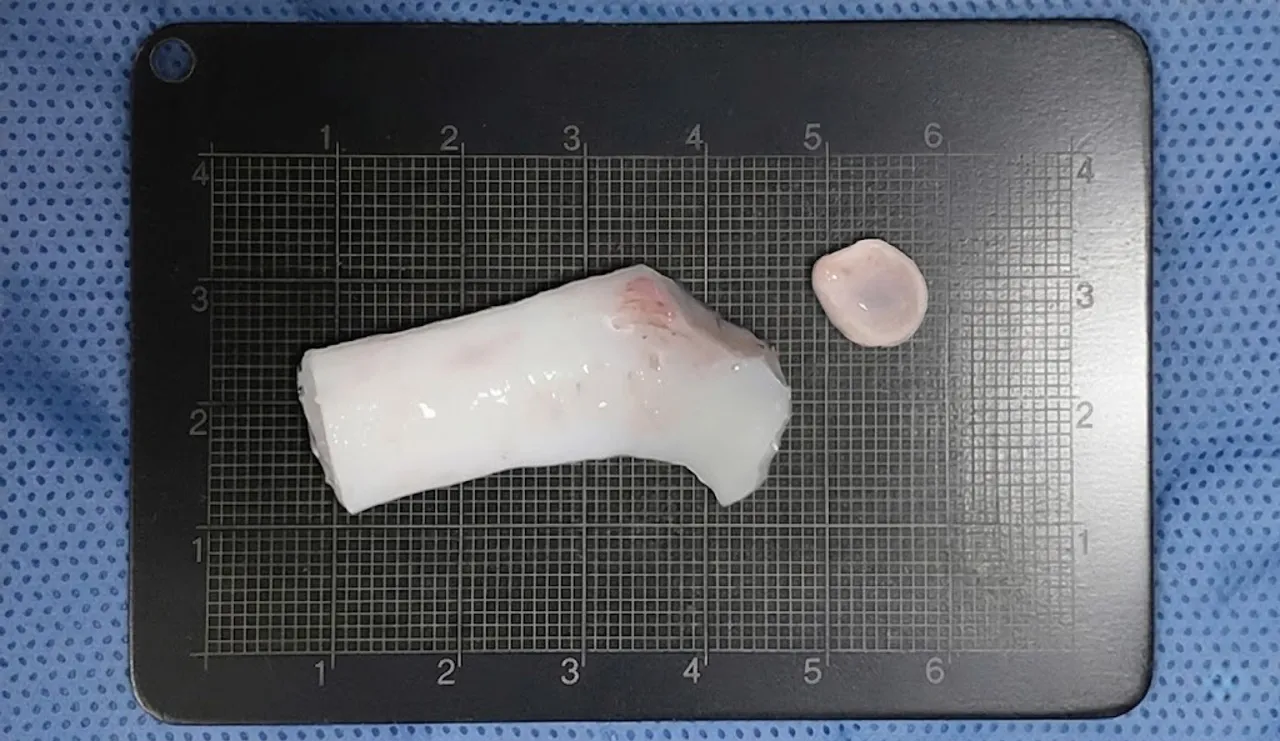
(Left: harvested Autologous Rib Cartilage / Right: harvested Ear Cartilage)
The most suitable material for rhinoplasty is Autologous Cartilage.
For primary rhinoplasty, Ear Cartilage and Septal Cartilage are considered first, but in revision cases, Ear Cartilage and Septal Cartilage have usually already been used or are insufficient.
In addition, complex Rhinoplasty Revision often requires rebuilding the nasal structure from the ground up. In such cases, sturdy cartilage and a sufficient amount of Autologous Cartilage are needed. Autologous Rib Cartilage is the best material that meets all of these requirements.
Benefits of Using Autologous Rib Cartilage
✓ Abundant quantity
Autologous Rib Cartilage is available in greater quantity than other autologous cartilage. It can be carved and used in sufficient amounts for the areas needed during surgery.
✓ Strong and durable
Because Autologous Rib Cartilage is relatively firmer than other cartilage, using it to create a columellar strut during nasal tip surgery or to reconstruct Septal Cartilage helps prevent the nasal tip from drooping easily and maintains its shape well.
✓ Safety as Autologous Tissue
As it is Autologous Cartilage, the likelihood of foreign-body reactions or inflammation is very low.
JT’s Key Expertise in Autologous Rib Cartilage Rhinoplasty Revision
“To maximize the benefits of Autologous Rib Cartilage rhinoplasty, its characteristics must be well understood and applied appropriately.”
When the nose is opened during Rhinoplasty Revision, each patient’s condition is different. Cartilage may have dissolved, tissues may be adherent to one another, and in some cases each structural component must be reconstructed.
Even with an excellent material such as Autologous Rib Cartilage, experience and expertise in handling a wide range of revision cases are important to use it properly.
* Photo of Autologous Rib Cartilage harvested during an actual procedure at our clinic.
❶ Medical staff with 25 years of experience who thoroughly understand the characteristics of Autologous Rib Cartilage
❷ Advanced surgical techniques
❸ Techniques for harvesting only the necessary amount through minimal incision를 통해 필요한 양만큼 채취하는 테크닉
❹ Expertise in precisely carving and handling cartilage according to the characteristics of Rib Cartilage
Want to use Autologous Cartilage for the Nasal Bridge as well?
JT Rhinoplasty Revision Types and Surgical Methods
Case 01: A nose with a lowered nasal tip
When nasal tip height is not maintained after surgery and gradually decreases over time: The nasal tip is continuously subjected to pressure when making facial expressions. If it cannot sufficiently withstand this support force, the nasal tip will inevitably gradually droop over time. Therefore, revision surgery may involve adjusting excessive, difficult-to-maintain height to a more realistic height or strengthening support for the nasal tip strut using Autologous Rib Cartilage, among other options.
Case 02: A crooked nasal tip
When the Nasal Bridge and nasal tip are not aligned: Nasal tip deviation can occur for various reasons, including asymmetry of the nasal tip cartilage, misalignment between the Nasal Bridge and nasal tip, or septal deviation. Therefore, during revision surgery, it is important not simply to focus on the nasal tip, but to assess the overall structure, including the Septal Cartilage and nasal tip, before choosing an appropriate corrective method.
Case 03: Crooked Nasal Bridge
When the Nasal Bridge is deviated to one side or appears crooked: When the Nasal Bridge is crooked, the cause is carefully analyzed—whether it is due to insufficient space for the Implant or an issue with the underlying foundation where the Implant is placed—and the internal nasal structure, as well as the Implant position and shape, are corrected to create a straight nose.
Case 04: A nose with visible Implant and cartilage
When an excessively high Implant is used relative to skin thickness, cartilage is stacked too high, or the skin has thinned due to repeated revision surgery: Excessive use of an Implant or cartilage relative to the thickness and elasticity of the skin and Soft Tissue can cause visibility, contour show-through, and a foreign-body sensation. The existing Implant may be removed or replaced with a thinner, more suitable Implant, and if necessary, the skin thickness may be reinforced using fascia or Dermal Graft to reduce show-through.
Case 05: An obviously operated-looking nose
When the nose looks overly artificial or unnatural after surgery: The entire line from the Nasal Bridge to the nasal tip is redesigned in balance with the individual’s face to achieve a natural, harmonious nasal shape.
Case 06: When the Implant moves
When the Implant is not stably fixed and moves when pressed or touched: Implant movement occurs through the combined effects of various factors, including Implant selection, extent of Dissection, and fixation status. Therefore, precise repositioning that considers the anatomical structure is important during revision surgery.
Case 07: A nose with progressing Capsular contracture
When scar tissue inside the nose excessively contracts due to repeated inflammation and infection: Revision surgery for a contracted nose is a complex revision procedure that requires first improving the tissue environment altered by inflammation and then redesigning a stable structure. After Implant Removal, the contracted scar tissue and areas of Adhesion are sufficiently released, and the internal nasal structure is reconstructed using inflammation-resistant Autologous Tissue or an appropriate Implant depending on the condition.
Case 08: A nose with a history of inflammation
When inflammatory symptoms such as pain, warmth, and swelling occurred due to infection at the surgical site: In a nose with a history of inflammation, reducing the possibility of recurrent infection is important during revision surgery. The existing Implant was removed, and the structure was reconstructed with inflammation-resistant Autologous Rib Cartilage to ensure safety and structural support.
JT Autologous Rib Cartilage Rhinoplasty Revision Procedure
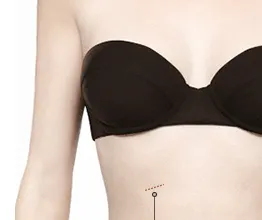
Minimal incision: a 2–3 cm minimal incision below the inframammary fold
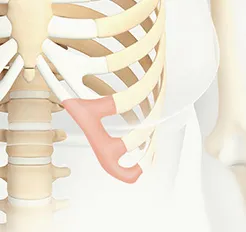
❶ Autologous rib harvest: Harvest Rib Cartilage as needed
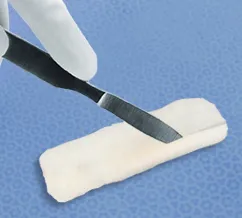
❷ Rib Cartilage design: Customized design and trimming of Rib Cartilage according to the patient’s nose
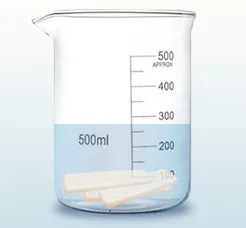
❸ Warping prevention: Pretreatment process to prevent warping
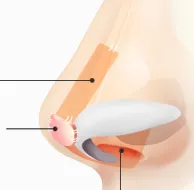
❹ Grafting: Graft cartilage shaped to fit the nose
JT Autologous Rib Cartilage Rhinoplasty Revision Q&A
Q. Is a CT scan performed during a rhinoplasty consultation?
A. Yes, a CT scan is performed during a rhinoplasty consultation. CT enables a more accurate assessment of the current nasal structure and condition.
Q. Are there cases where Autologous Rib Cartilage cannot be used?
A. If Autologous Rib Cartilage calcification is severe, the usable portion may be limited even after harvesting. In such cases, we recommend using other materials.
Q. If I previously had surgery using autologous rib cartilage, can I not undergo another Autologous Rib Cartilage Rhinoplasty Revision?
A. Even if you previously underwent surgery using autologous rib cartilage, another Autologous Rib Cartilage Rhinoplasty Revision is possible. Revision surgery may be performed by harvesting unused cartilage from the opposite side or from the 7th, 8th, or 9th rib. If the previously used Autologous Rib Cartilage is in good condition, it may also be reused.
Q. What about pain and scarring at the autologous rib harvest site?
A. Autologous rib harvesting is performed through a minimal incision, and a faint scar of approximately 2–3 cm may remain. The degree of scarring varies depending on care. Pain may feel throbbing for an average of 7 days to 3 weeks, with individual variation.
BEFORE & AFTER
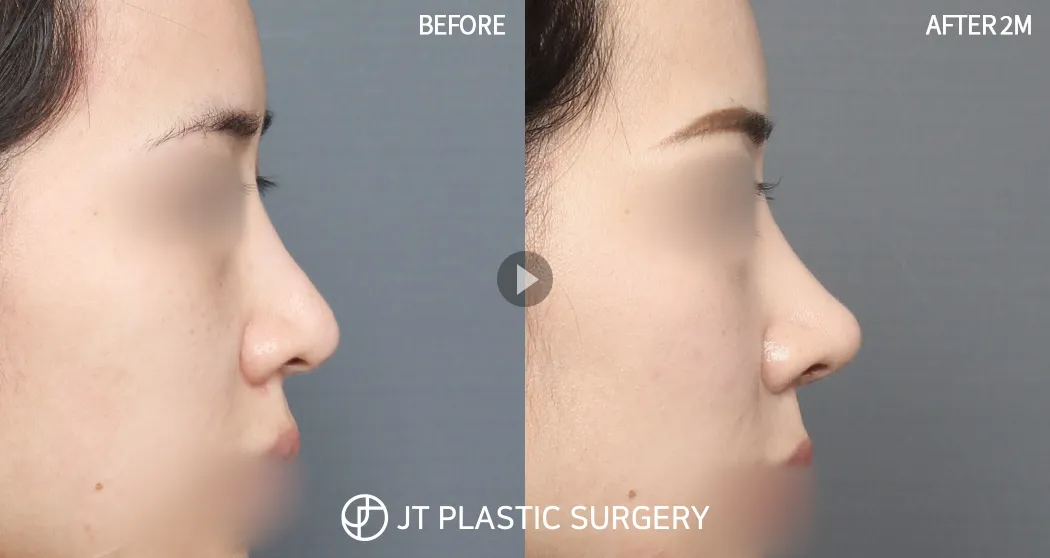
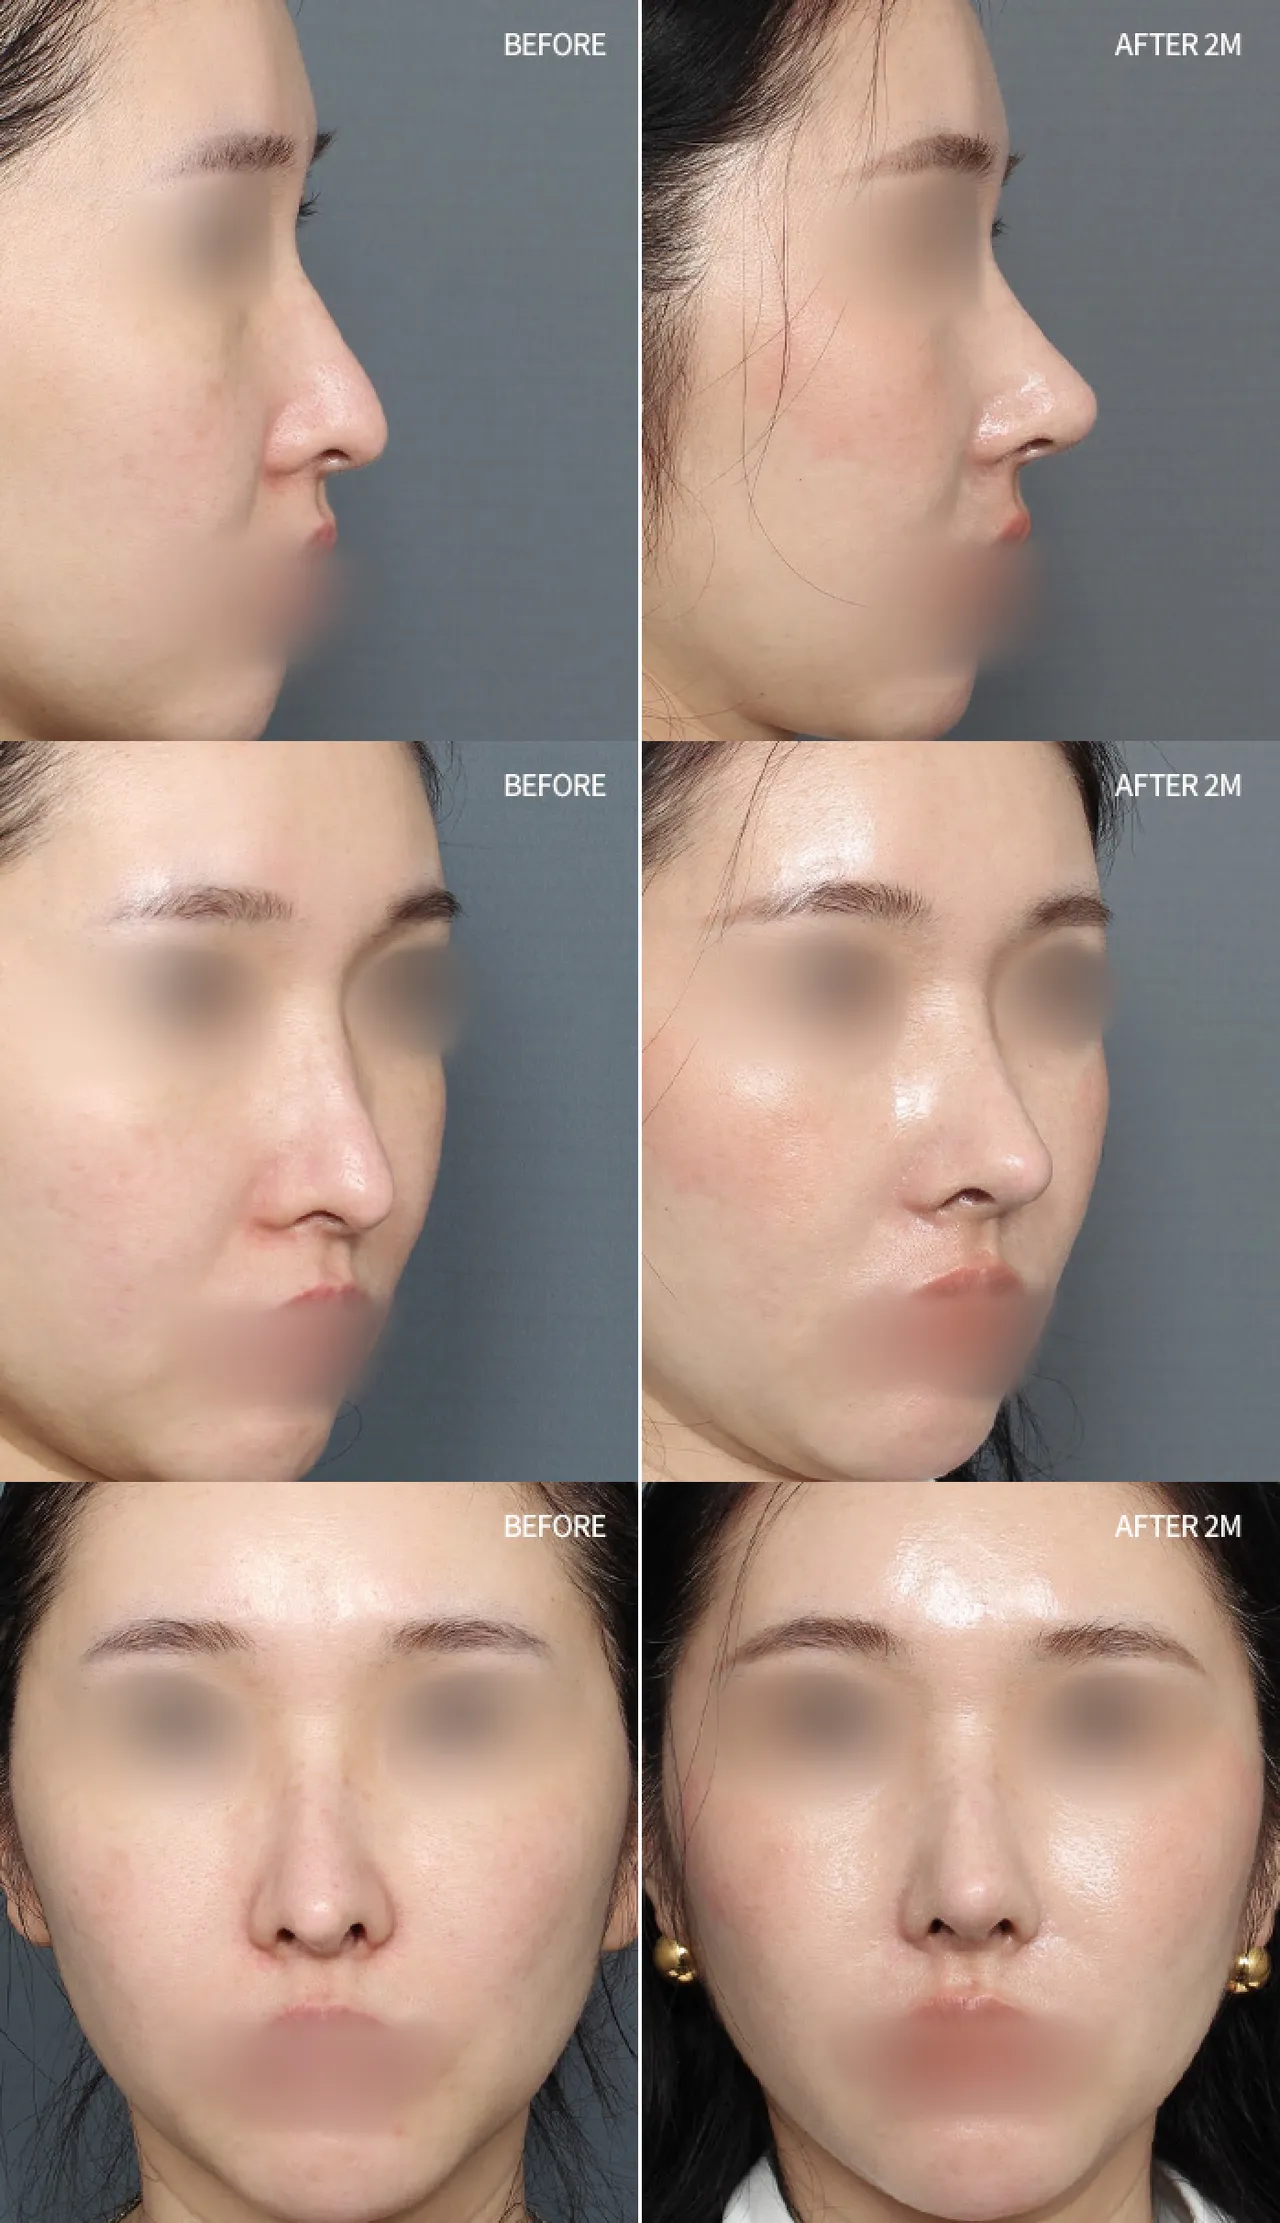
Rhinoplasty Revision + Nostril Lowering + Nasolabial Angle Correction, 2 months after surgery
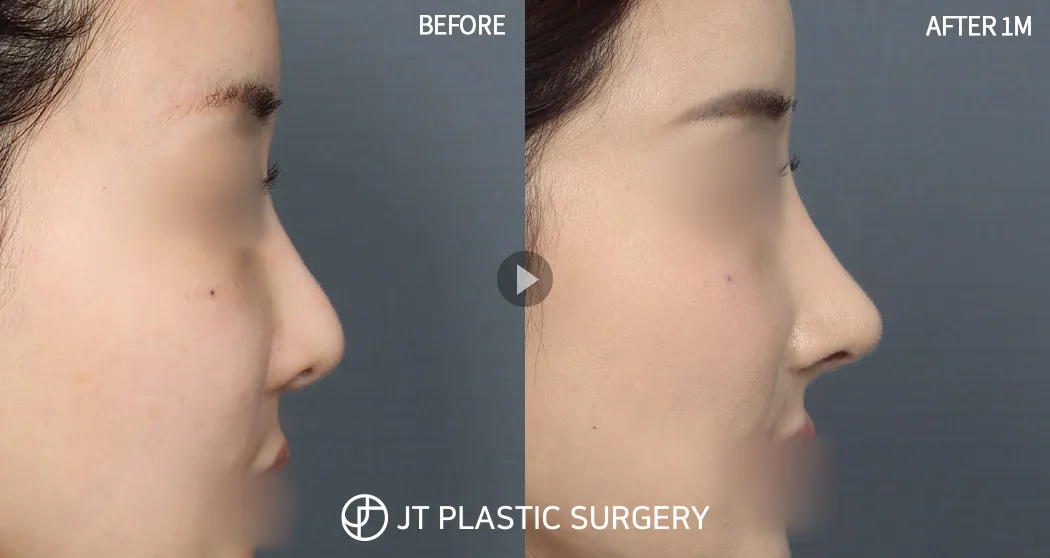
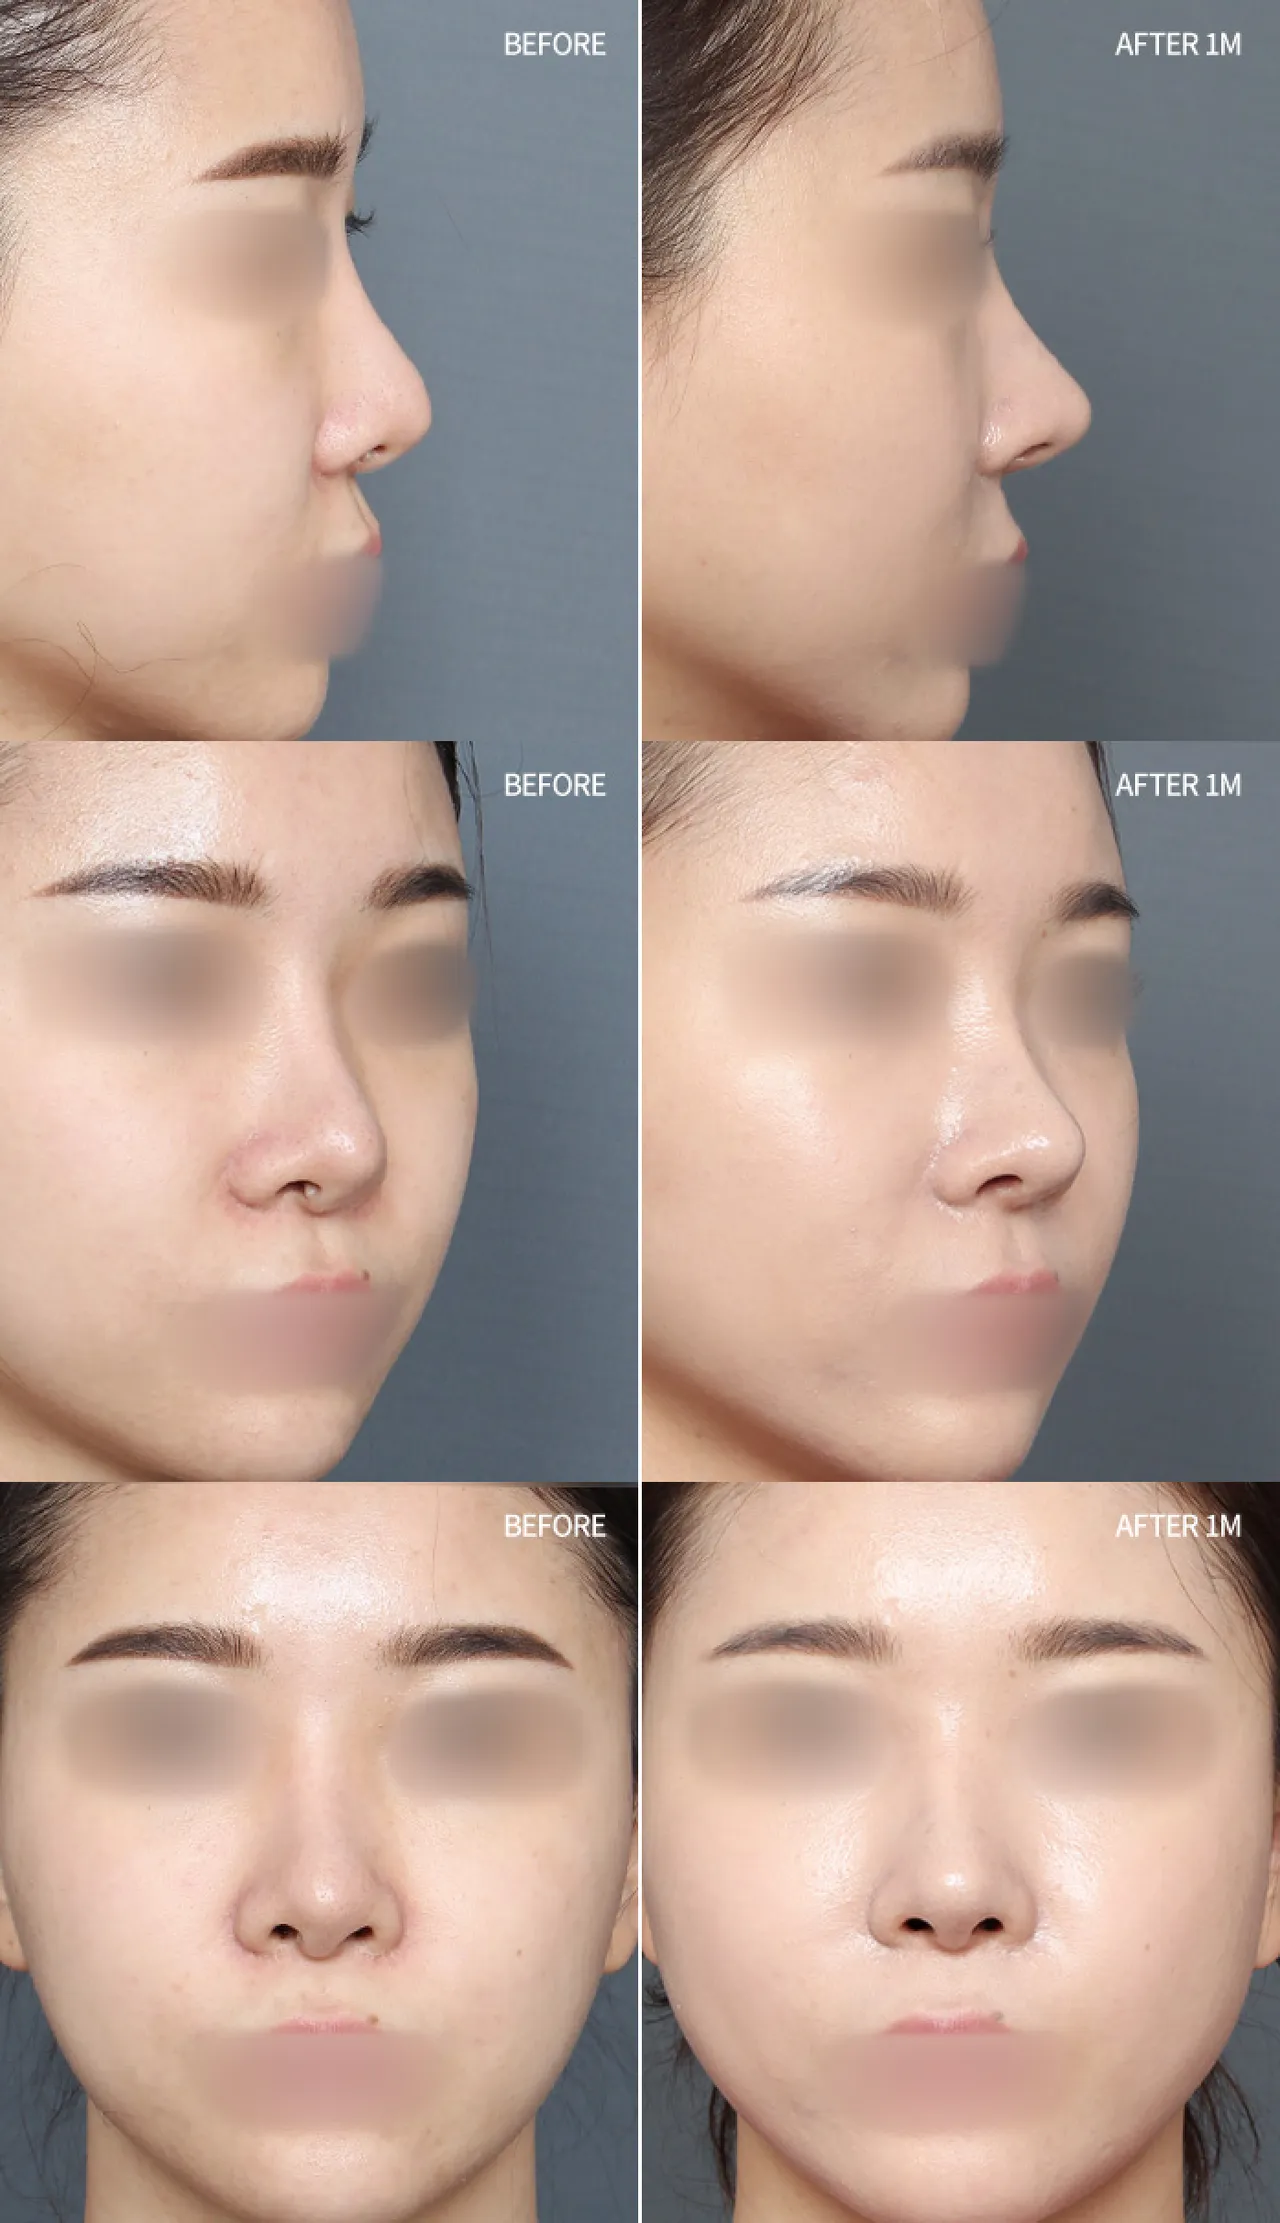
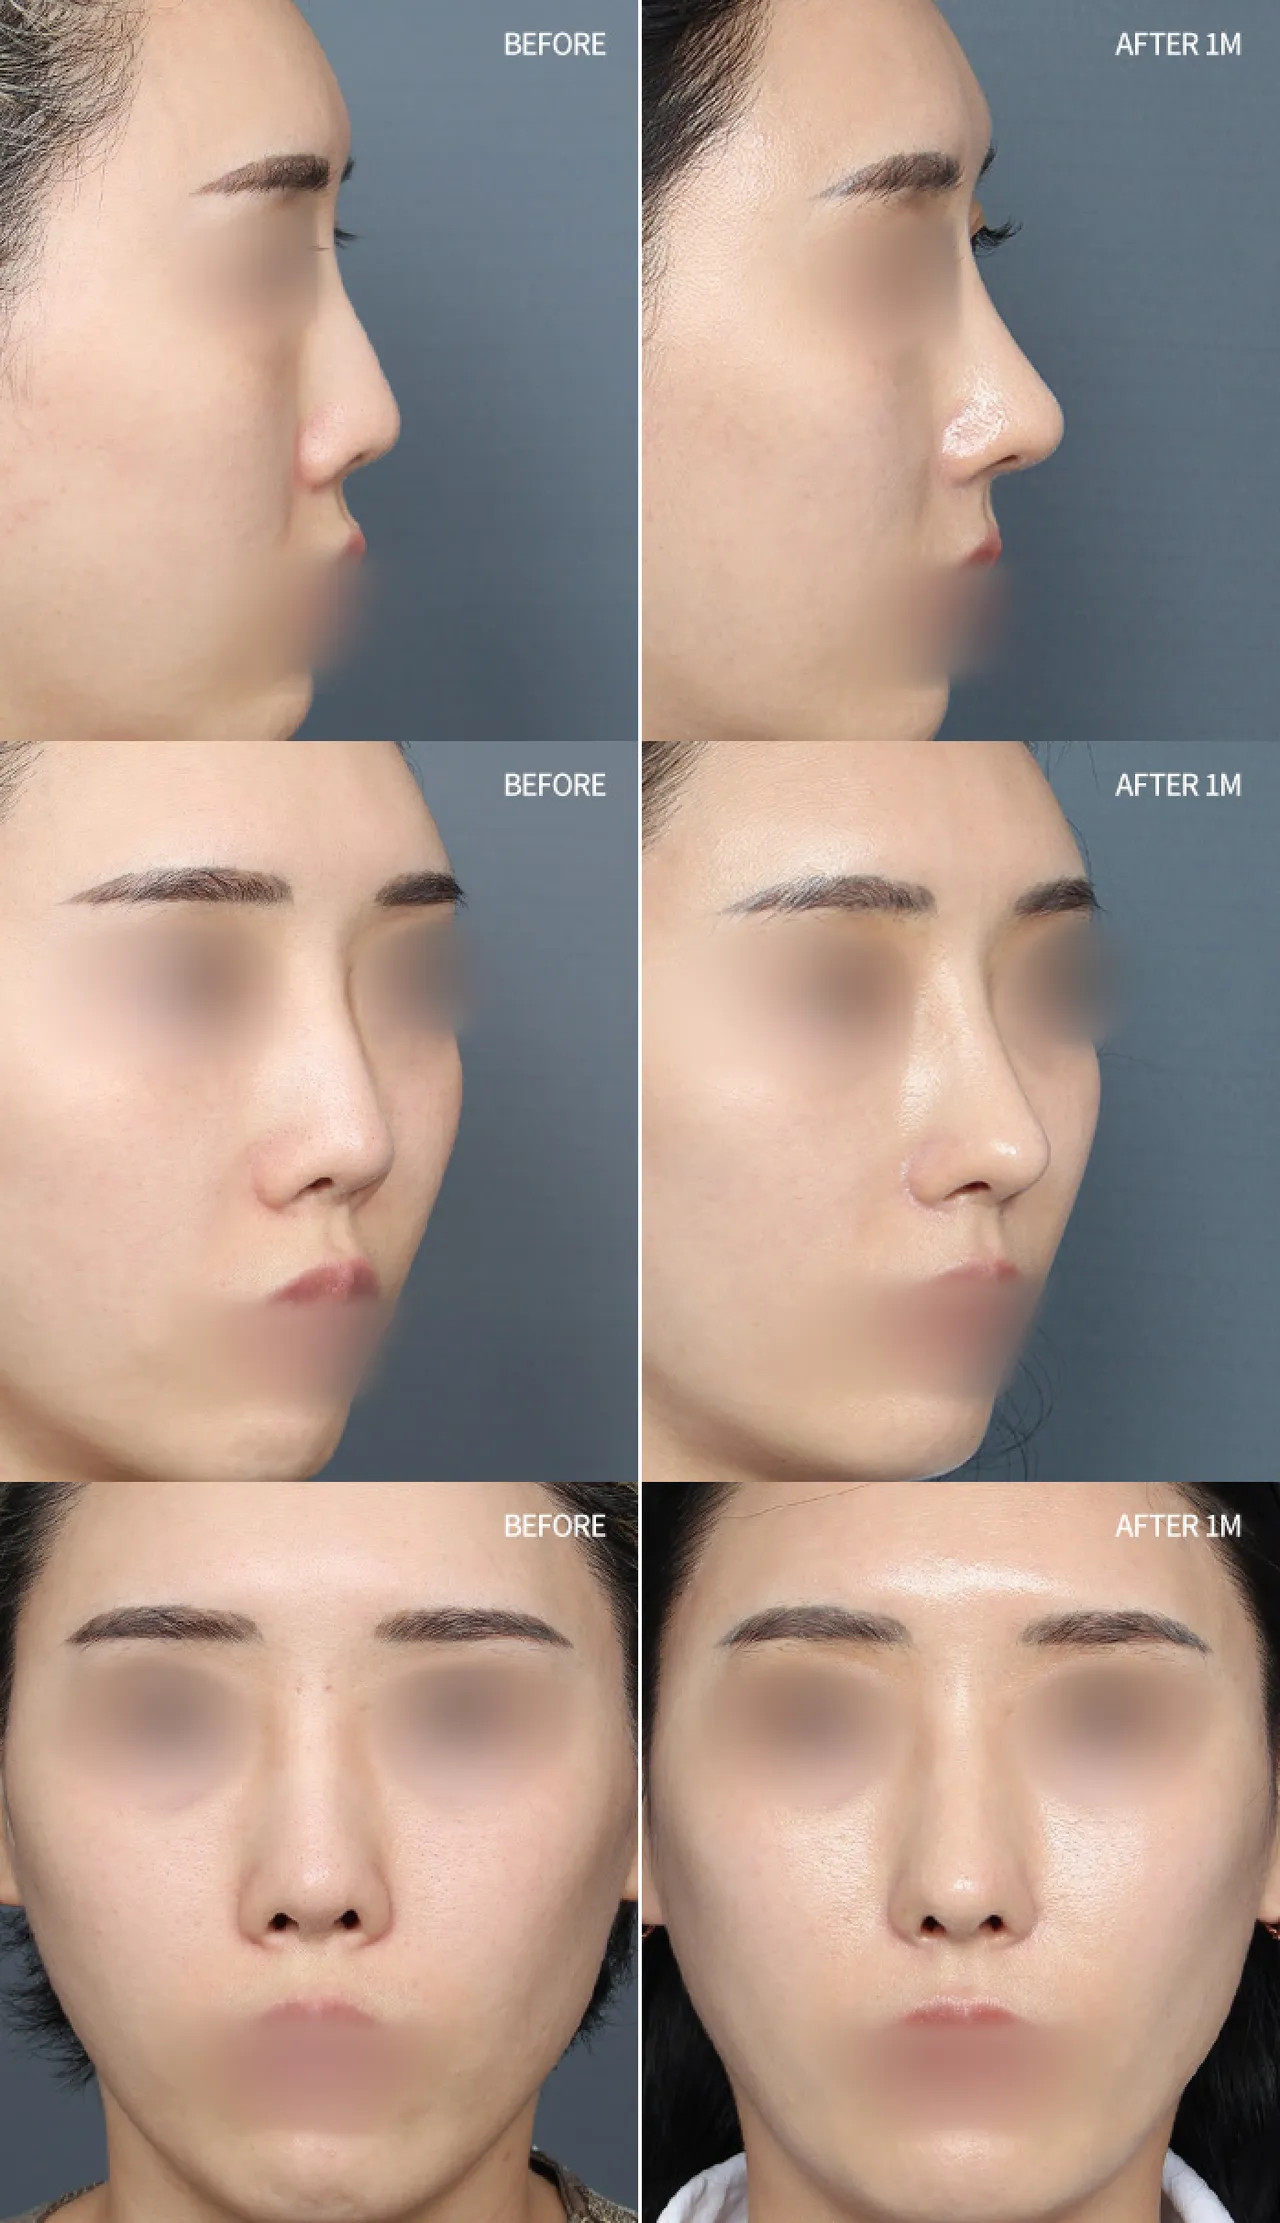
Rhinoplasty Revision + Dorsal Hump Correction + Crooked Nose + Long Nose + Nasolabial Angle Correction + Dermal Fillers removal, 1 month after surgery
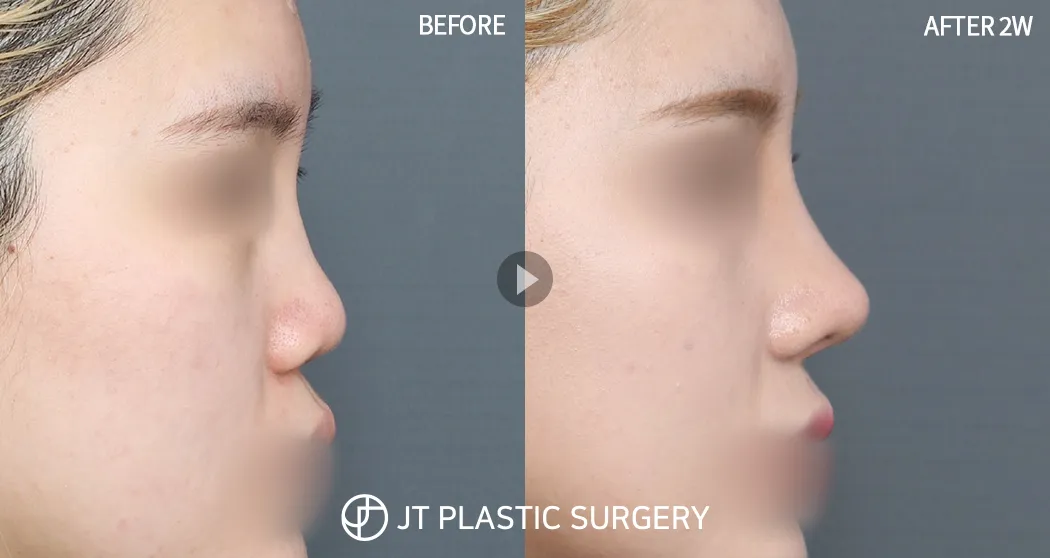
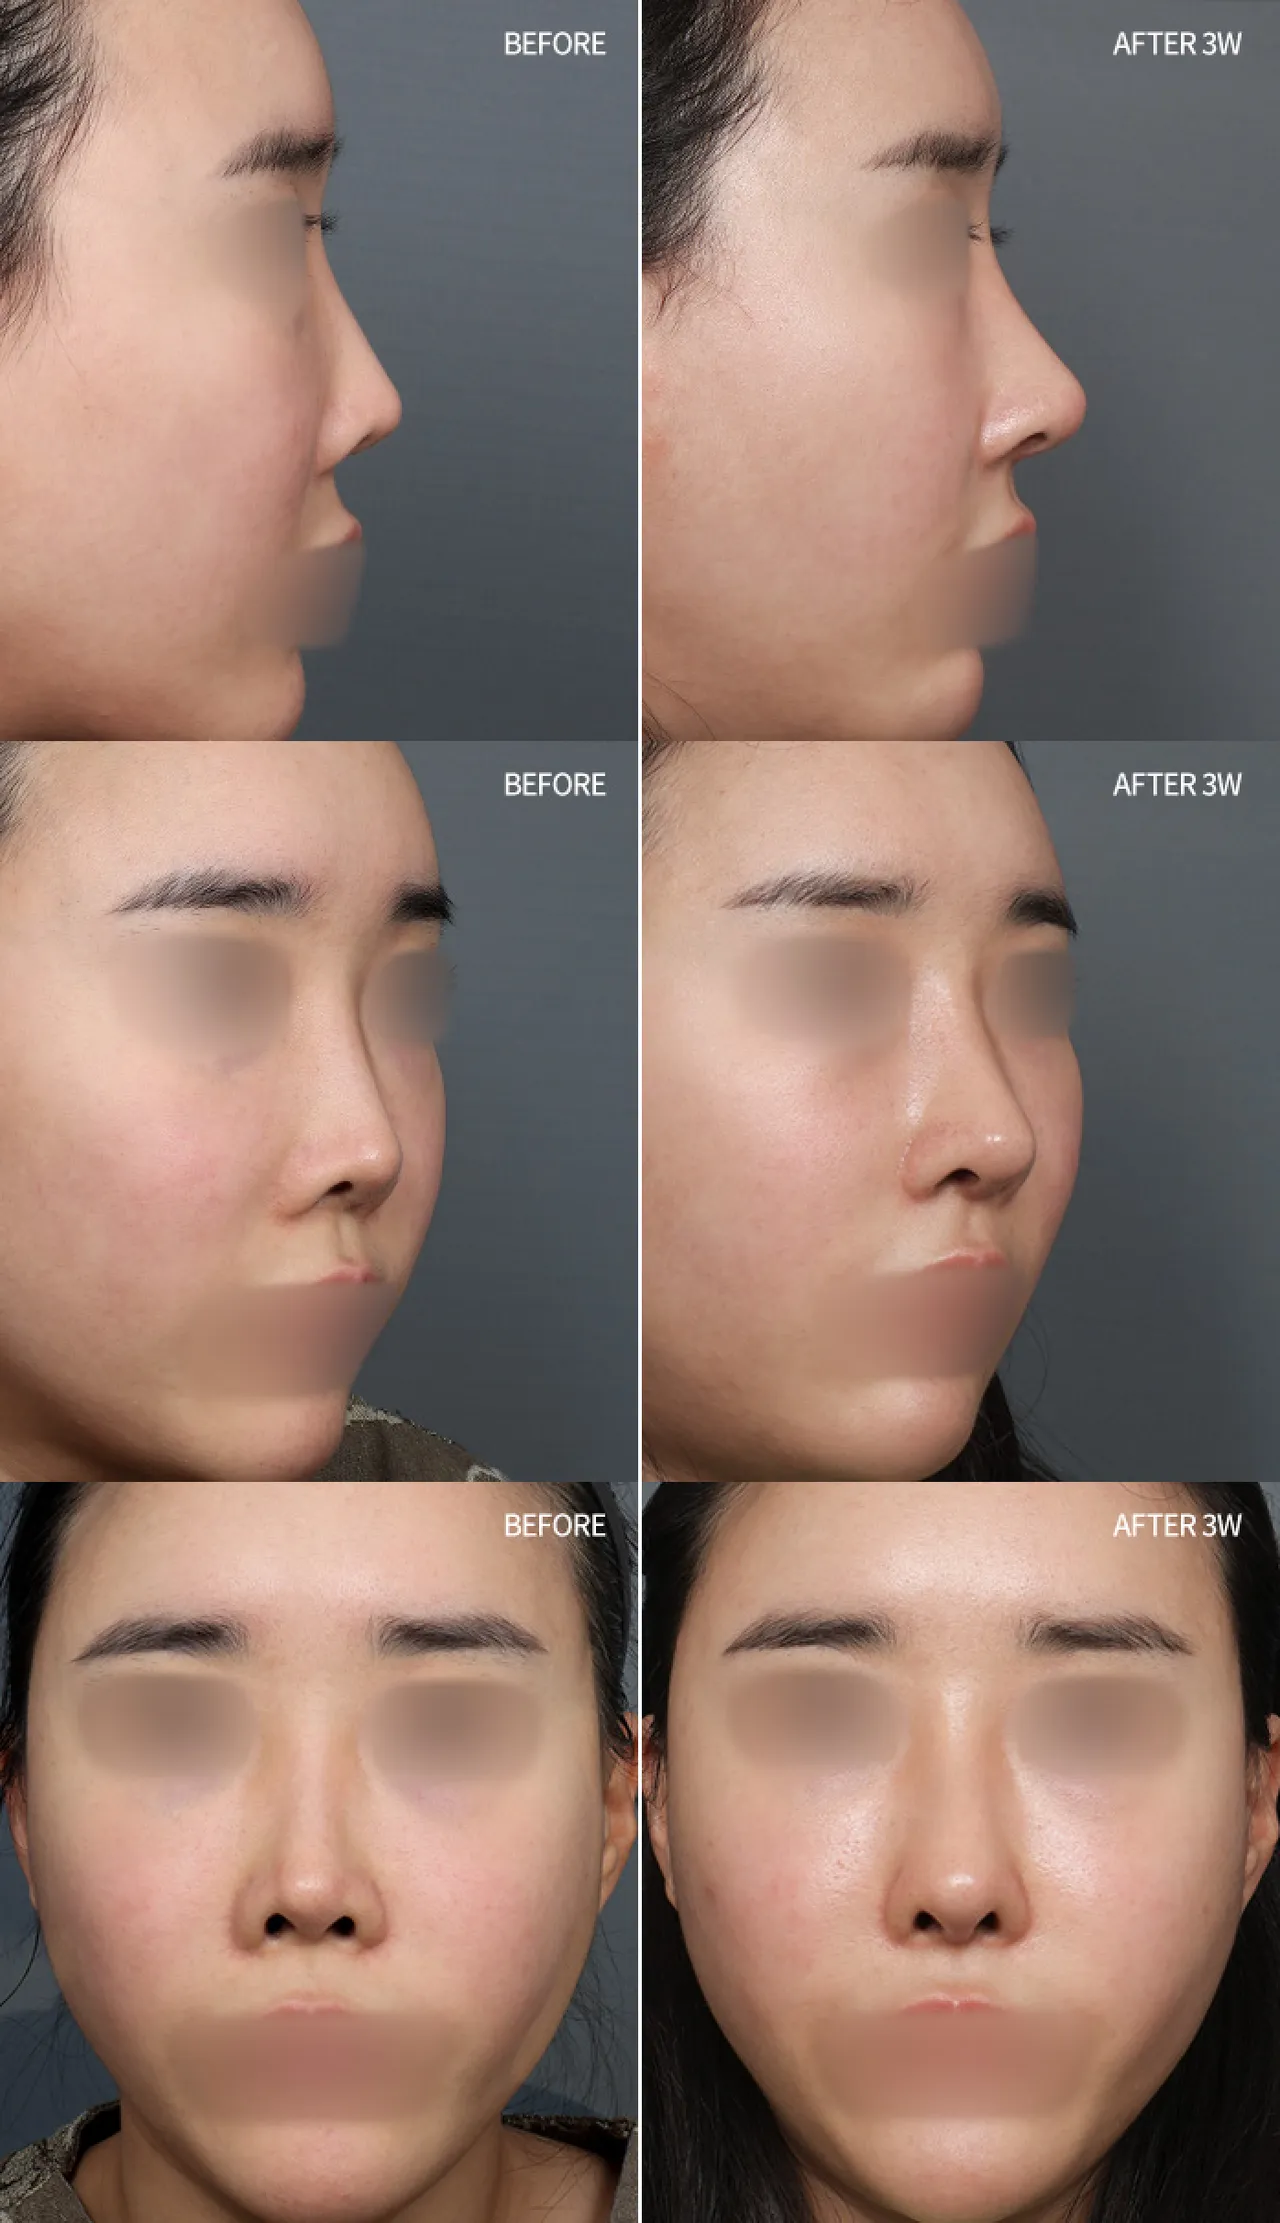
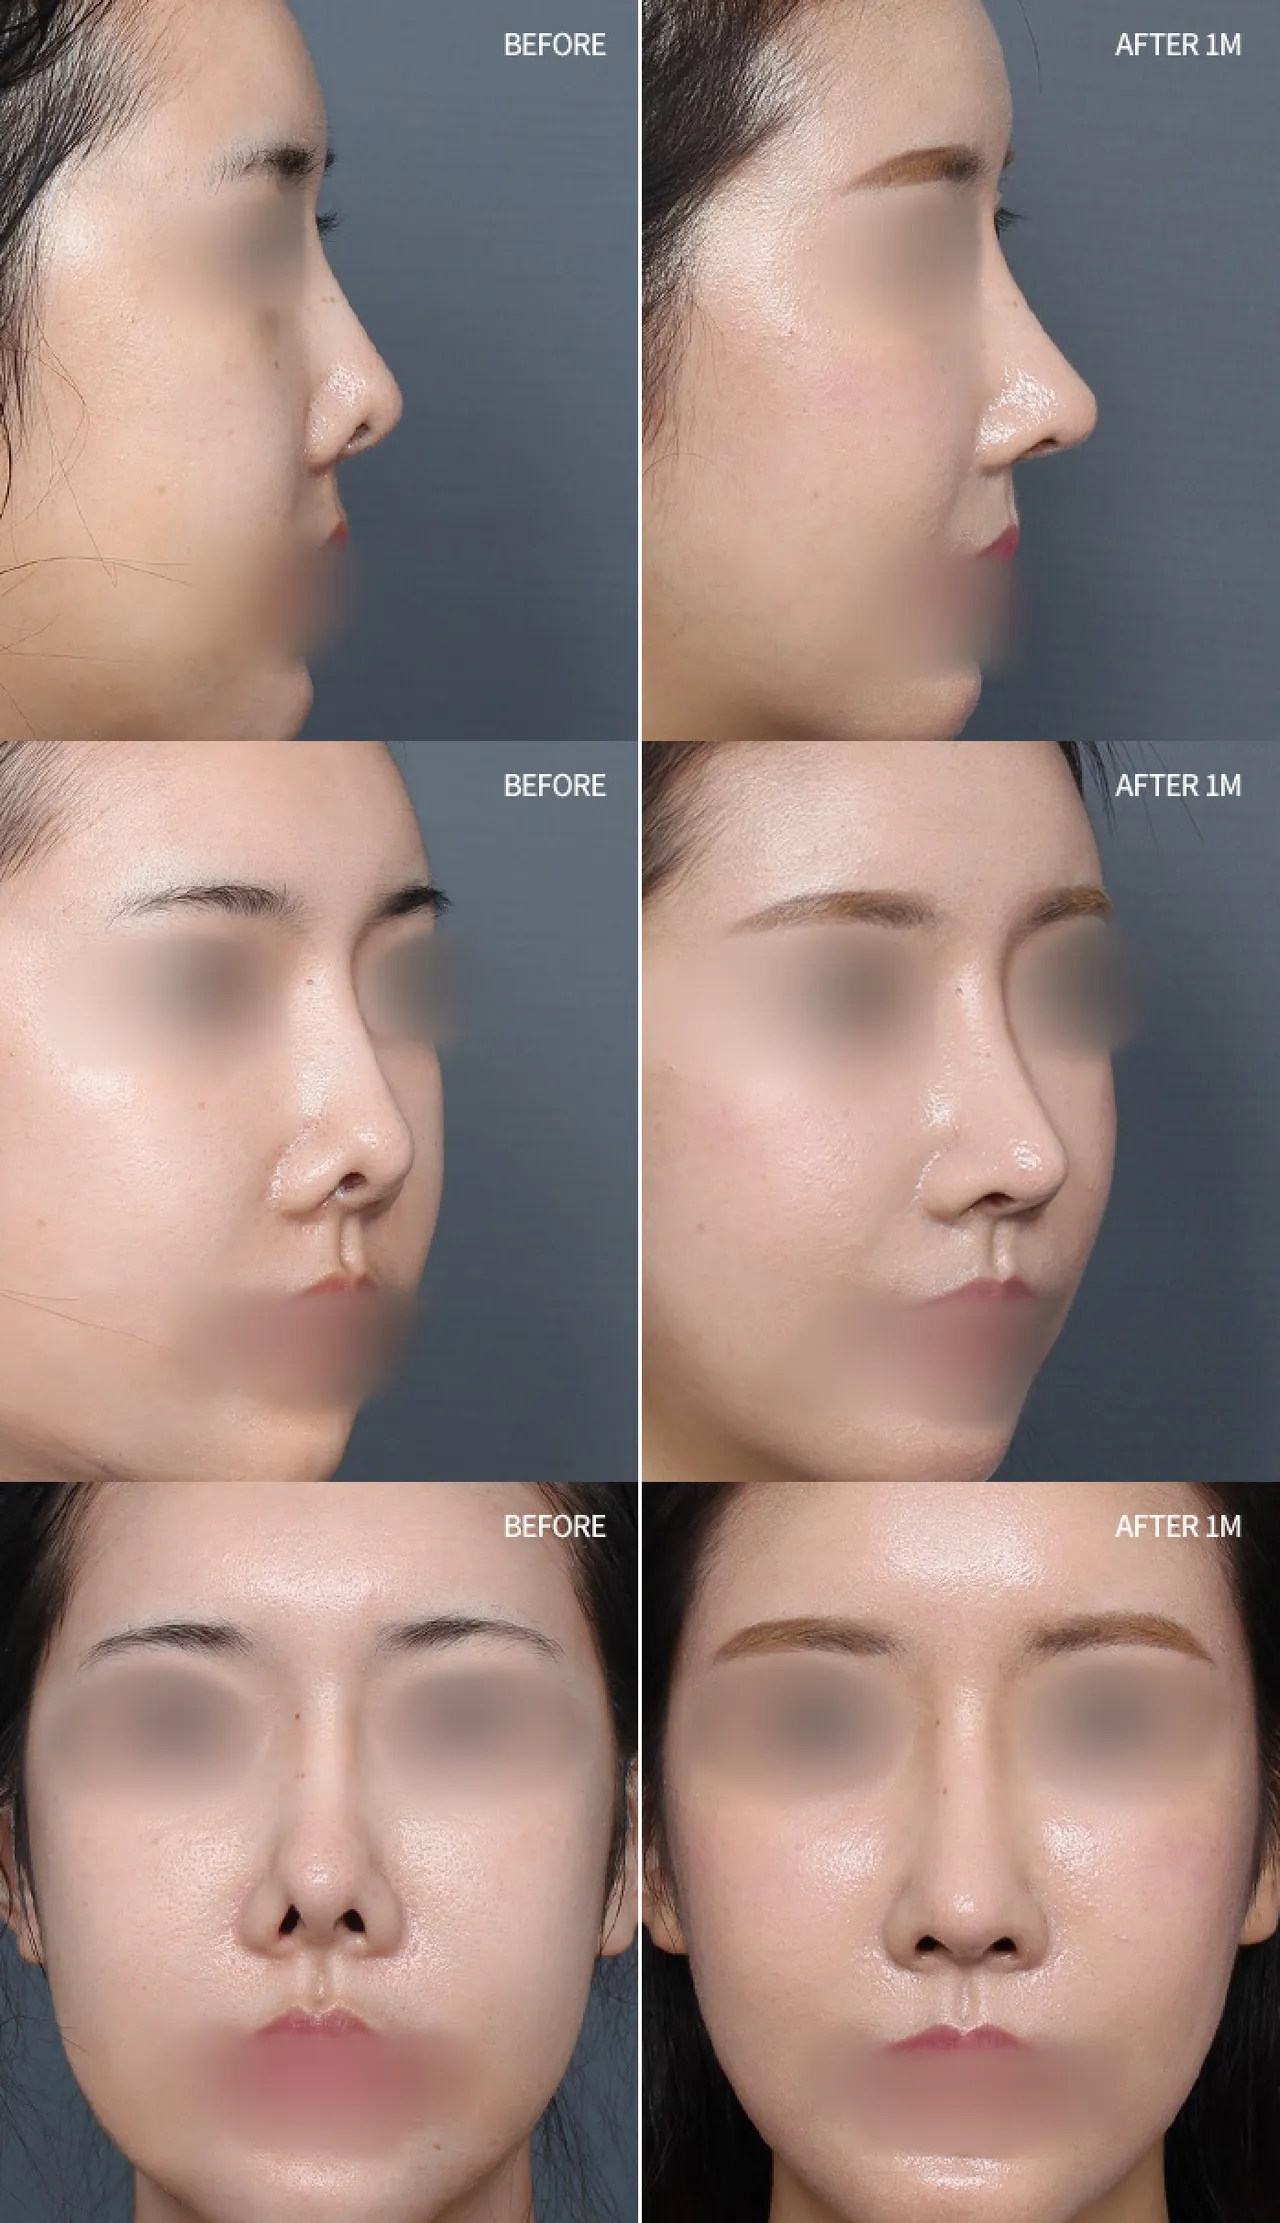
Rhinoplasty Revision (Autologous Rib Cartilage) + Wide Nose + Columella Lengthening, 2 weeks after surgery
02 Contracted Nose Reconstruction
Reconstructing structural problems, not simply correcting them

✓ Surgery time: approximately 4 hours
✓ Anesthesia: sedation/local anesthesia (or general anesthesia)
✓ Hospitalization: not required
✓ Suture removal: approximately 7 days later; approximately 14 days later for the rib harvest site
✓ Follow-up visits: approximately 2–3 times
✓ Return to daily activities: approximately 7 days later
JT YOUTUBE
Accurate plastic surgery information through videos
JT Contracted Nose Reconstruction
A contracted nose occurs when the skin of the nasal tip contracts and hardens due to repeated inflammation, foreign-body reactions, and other factors after surgery, resulting in an upturned and shortened nasal tip.
As Capsular contracture progresses, nasal tip deformation becomes more severe, so the underlying cause must be identified and addressed promptly.
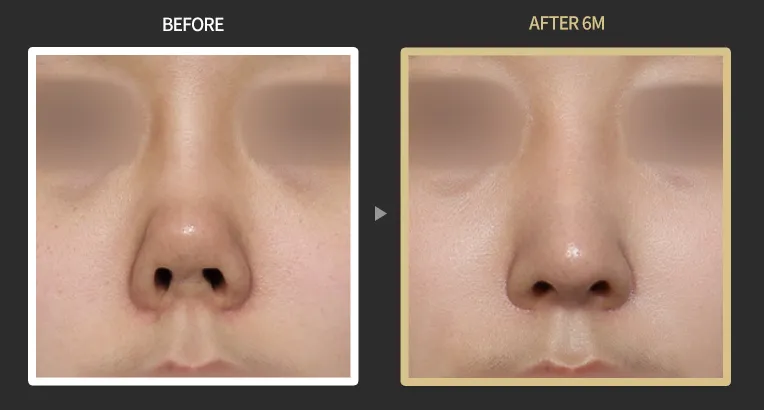
Actual JT Contracted Nose Reconstruction Cases
Why Contracted Nose Reconstruction Is Difficult
Contracted Nose Reconstruction is difficult because
✓ the normal structure has often already collapsed,
✓ damaged skin tissue has limited ability to stretch,
✓ poor blood circulation raises concerns about recurrent inflammation and Capsular contracture, and
✓ usable materials are also limited.
Therefore, in Contracted Nose Reconstruction, recovery to normal tissue comes first. JT aims to reconstruct as natural a nasal shape as possible.
JT’s Key Expertise in Contracted Nose Reconstruction
“The key to successful Contracted Nose Reconstruction is seeing an experienced medical professional.”
Capsular contracture is not a common issue in rhinoplasty. Without sufficient clinical experience, it is difficult to encounter its various presentations.
Advanced surgical techniques themselves are important, but even more important is sufficient clinical experience to accurately diagnose the current nasal condition and establish an appropriate treatment plan.
❶ 25 years of clinical experience enabling accurate diagnosis of contracted noses
Assessment of the degree of Capsular contracture progression and establishment of a treatment plan based on experience in Contracted Nose Reconstruction
❷ Anatomical expertise to clearly distinguish tissue that should be removed from tissue that should be preserved
Reconstructing the contracted nose by preserving as much viable tissue as possible rather than removing everything indiscriminately
❸ Techniques for balanced reconstruction of the nasal tip, Columella, and septal support structure
Restoring a natural nasal shape by reconstructing the support structure of the entire nose
❹ Understanding of diverse Autologous Tissue, including Rib Cartilage, Dermal Graft, rib particles, and fascia
Expertise in accurately selecting and utilizing the necessary Autologous Tissue according to the treatment plan
JT Diagnostic Criteria for Contracted Nose Reconstruction
We accurately diagnose the current condition with expertise built on 25 years of clinical experience.

❶ Cause and severity of inflammation
❷ Degree of scar tissue and skin contraction
❸ Extent of damage to internal nasal tissue, including cartilage
❹ Skin thickness and tissue laxity
Contracted Nose Assessment Checklist
We closely analyze the degree of Capsular contracture and the current condition to provide staged treatment criteria.
Nose has started to turn upward (YES / NO)
Nose length has shortened (YES / NO)
Nostrils are becoming increasingly visible (YES / NO)
Nasal shape has become unnaturally deformed (YES / NO)
Skin has become thinner and redder (YES / NO)
Implant or cartilage is visible through the skin (YES / NO)
If you have these symptoms, consultation with a specialist is recommended. An accurate diagnosis of a contracted nose requires specialist consultation.
Actual Contracted Nose Reconstruction Cases
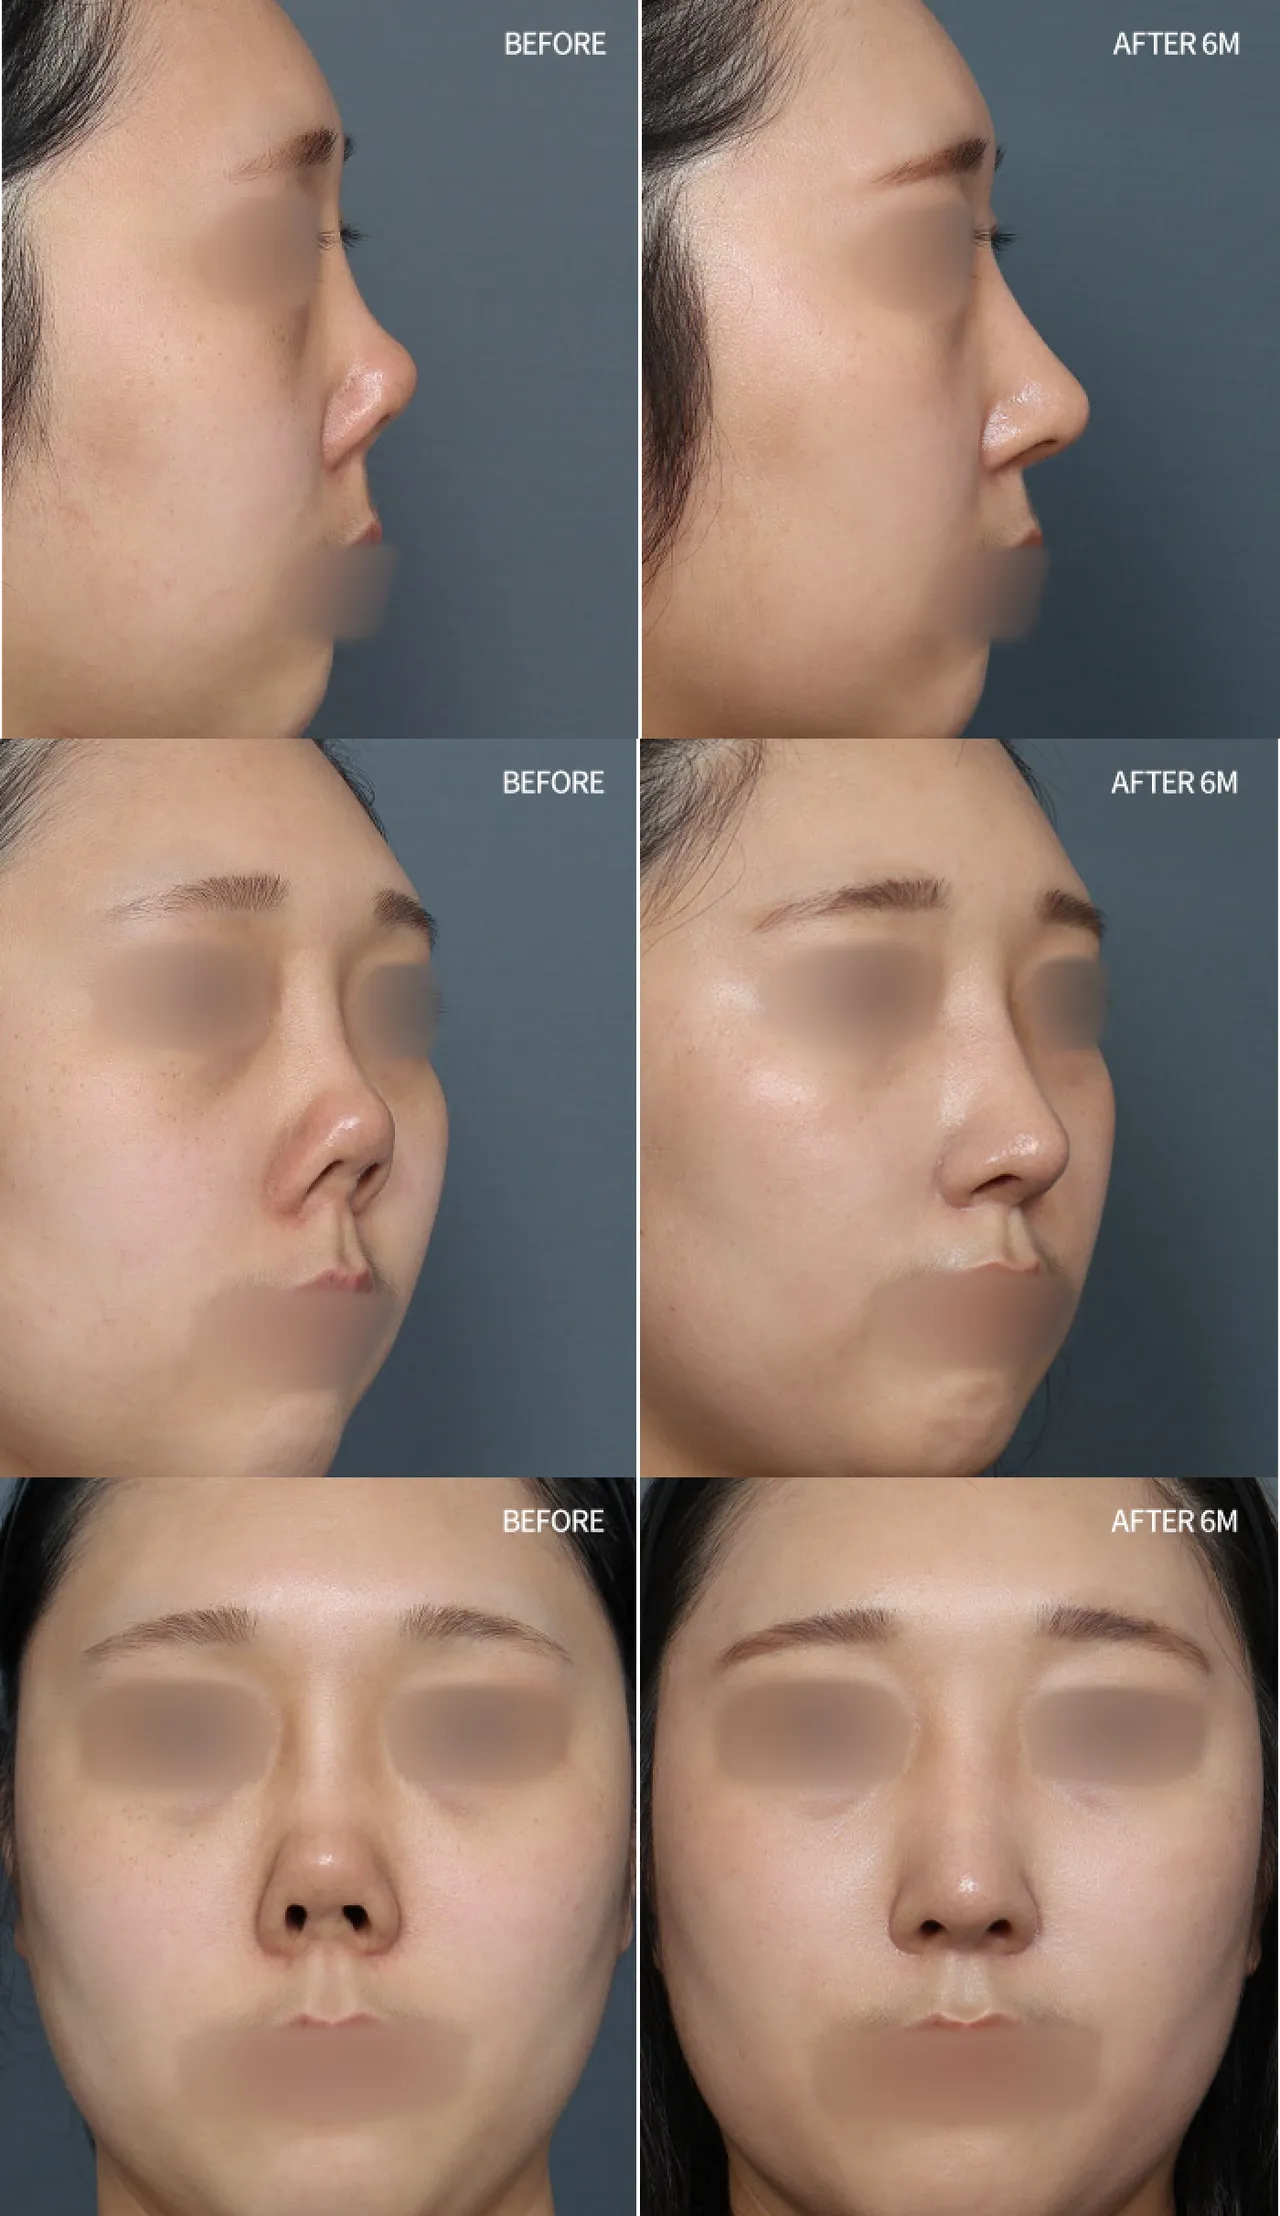
Case 01 Doctor's Note
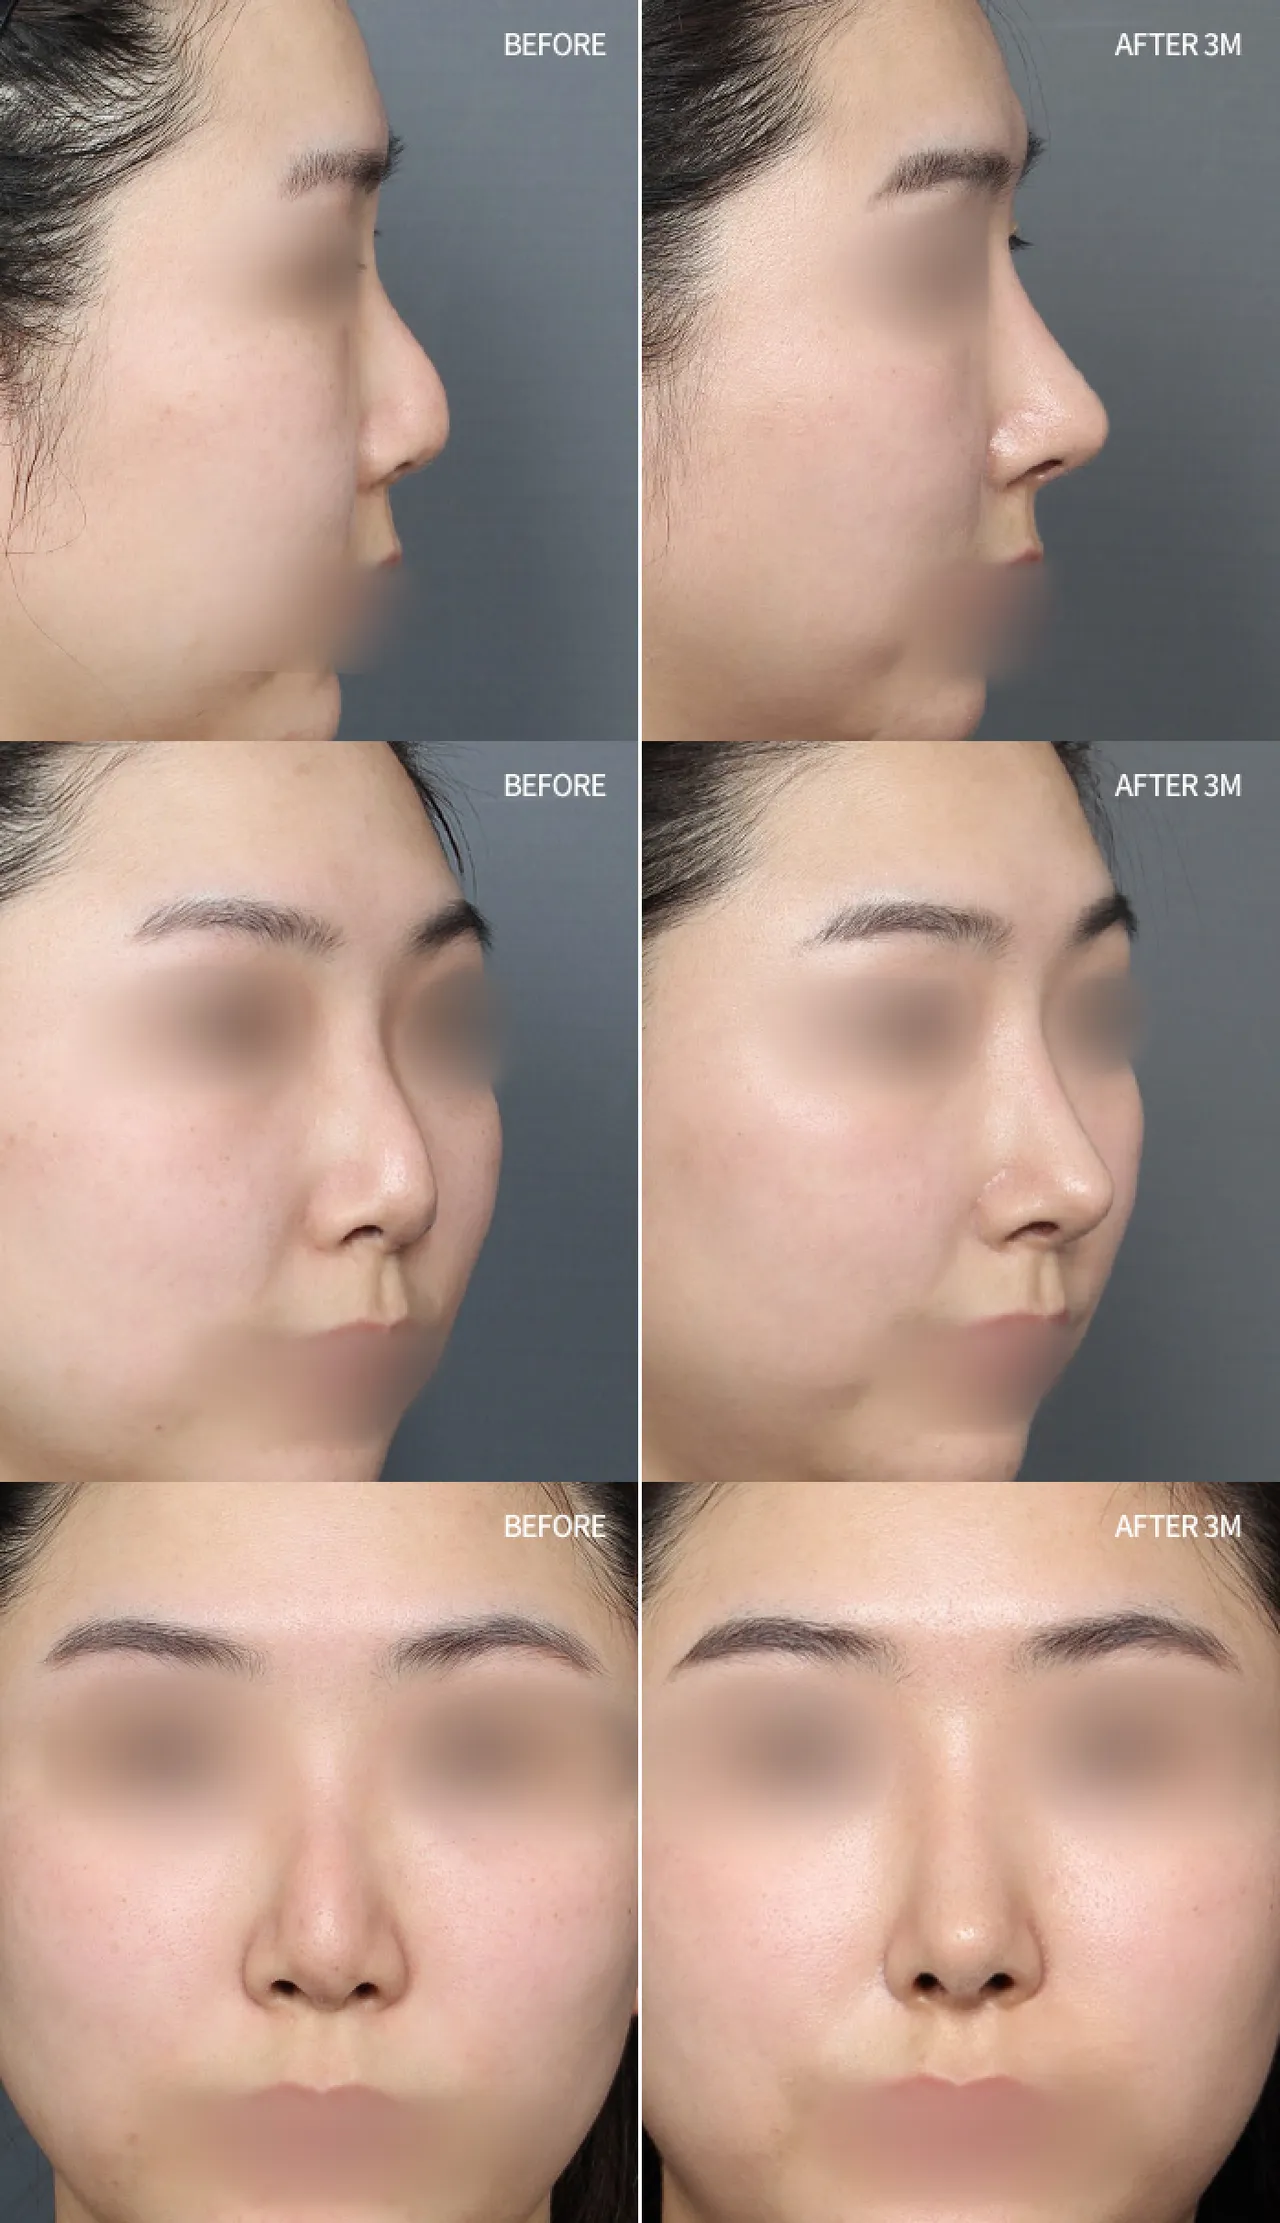
After primary rhinoplasty using Ear Cartilage and Silicone implant, Capsular contracture developed. The support structure was reconstructed using Autologous Rib Cartilage through septal reconstruction and septal extension. The progressed and thickened Capsule was completely removed, and the nasal tip was corrected by separating the upwardly displaced nasal tip cartilage and dissecting the skin to stretch it back to its normal position.
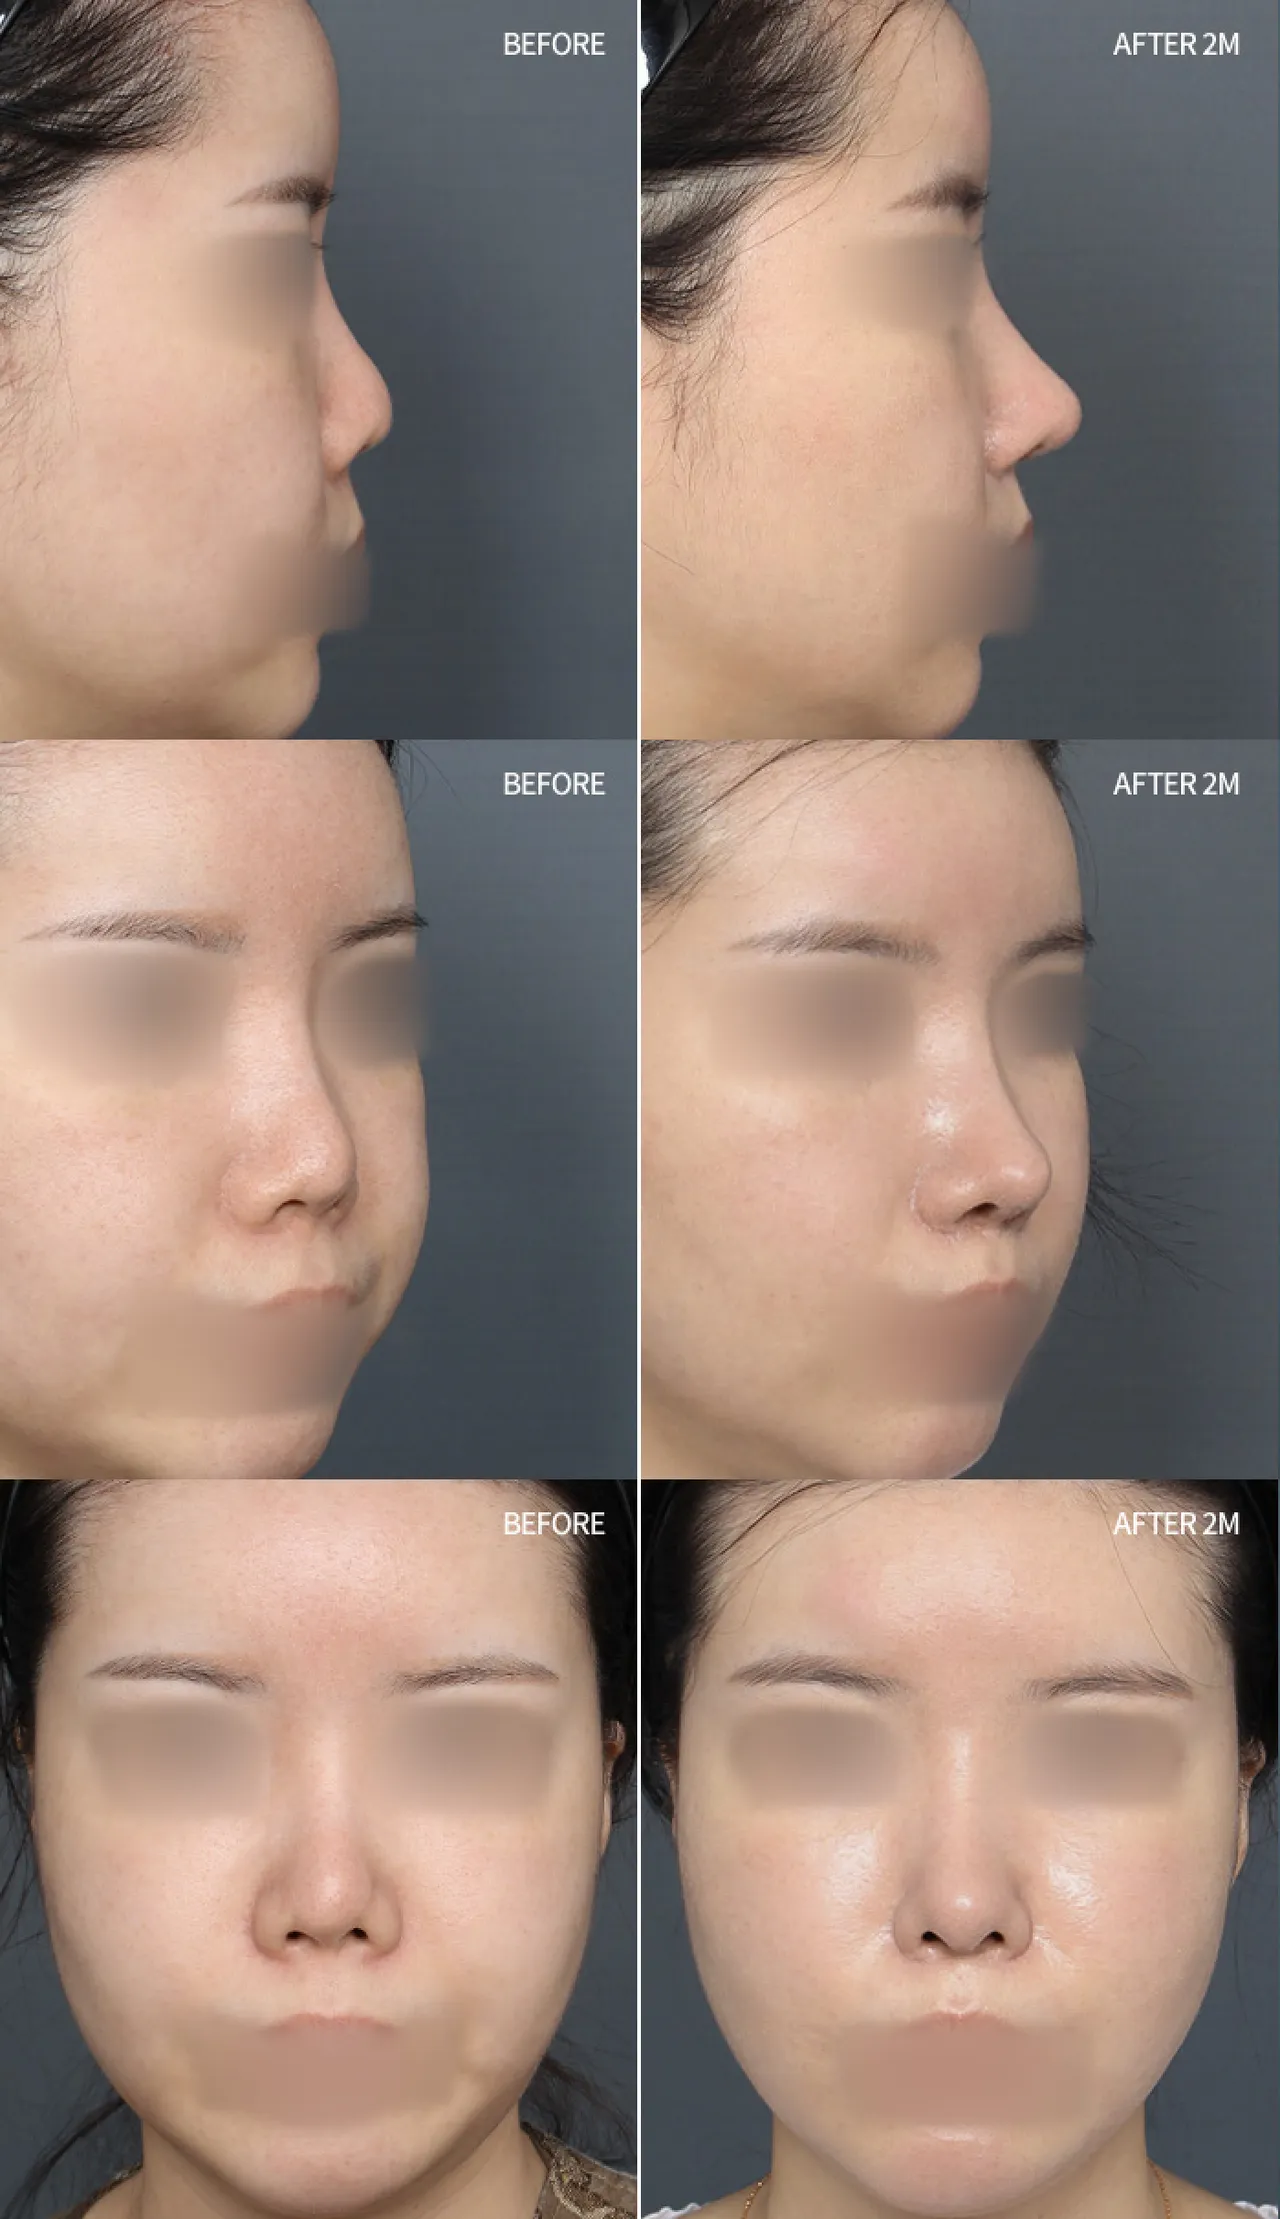
Case 02 Doctor's Note
After rhinoplasty, the nasal tip gradually lowered and shortened. The Septal Cartilage was reconstructed with overlay grafting using Donor Rib Cartilage and Ear Cartilage, and septal extension was performed to lengthen the nasal tip. This case also improved nostril shape through cartilage grafting for nostril lowering.
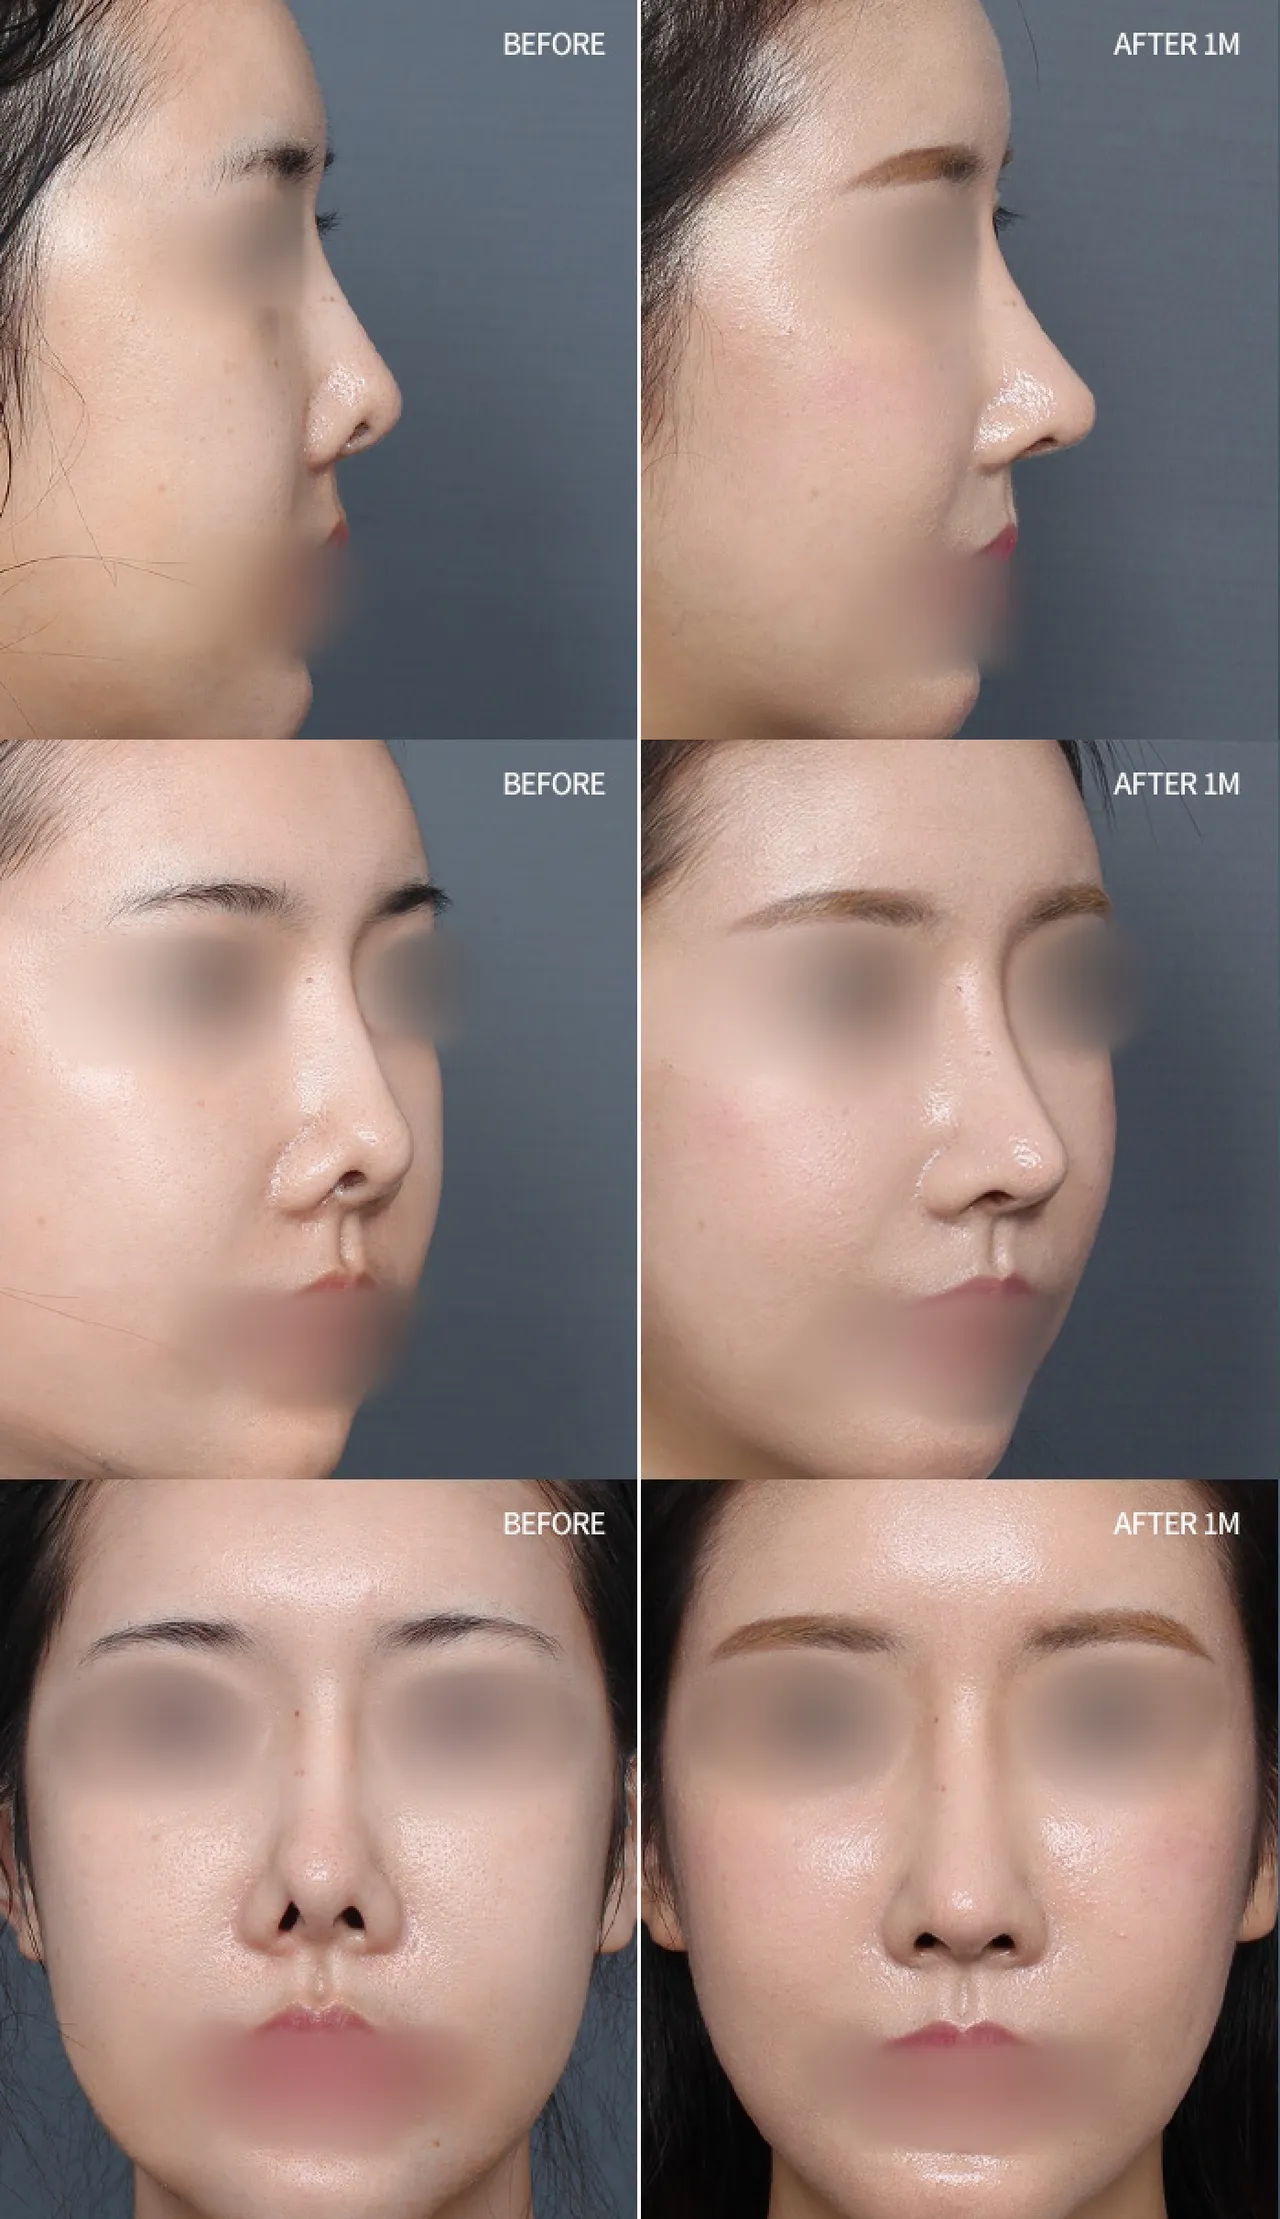
Case 03 Doctor's Note
In a case with originally small nasal tip cartilage and relatively thin skin, the nasal tip gradually became deformed, causing the sides of the nasal tip to appear pinched and the tip to become upturned and shortened. The nasal tip and nostrils were reconstructed with Autologous Cartilage. As the nasal tip was lowered, the nostrils became less visible and the pinched appearance improved.
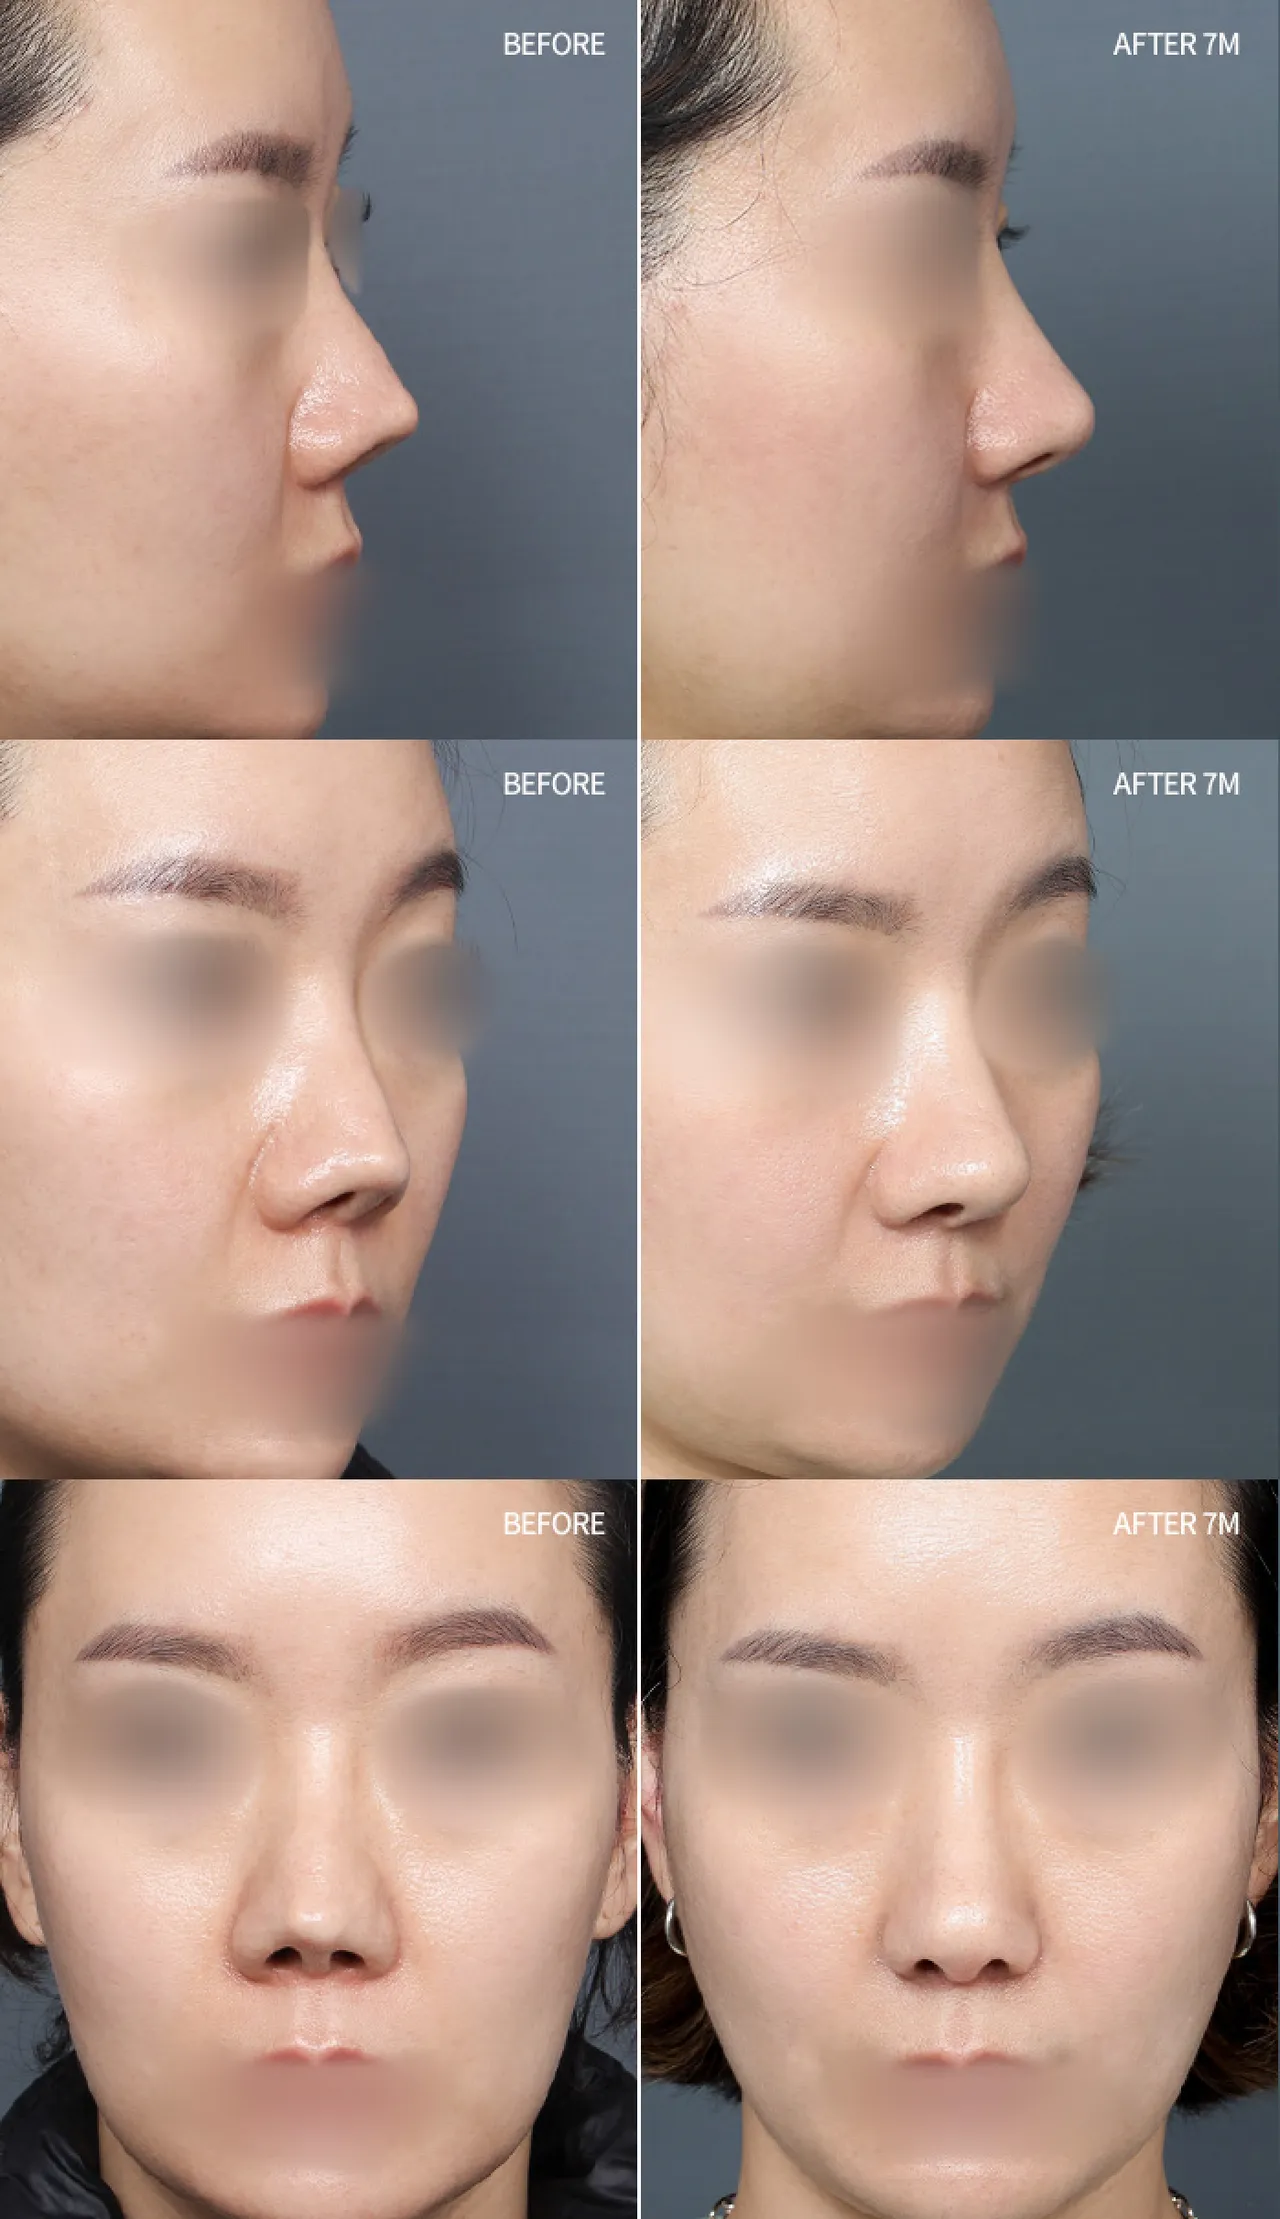
Case 04 Doctor's Note
After rhinoplasty, the nasal tip shortened and the skin became thinner, making the nasal tip cartilage visible and resulting in shortening of the nasal tip and Columella. The Septal Cartilage was extended to lengthen the Columella and nasal tip to their normal positions, and the nasal tip was naturally corrected with Autologous Cartilage grafting to the nasal tip and nostril-lowering cartilage grafting.
BEFORE & AFTER
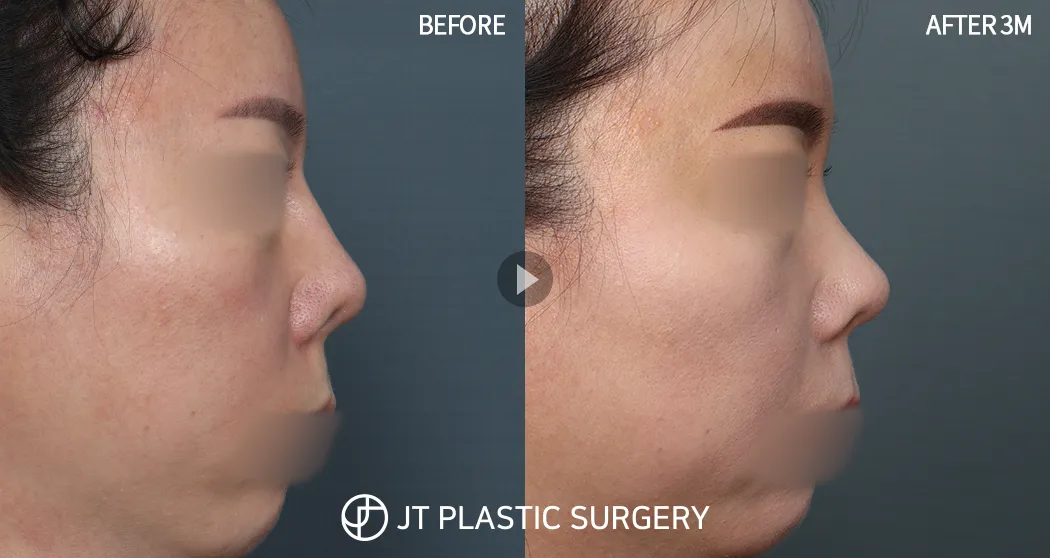
Contracted Nose (Silicone Implant removal), 3 months after surgery
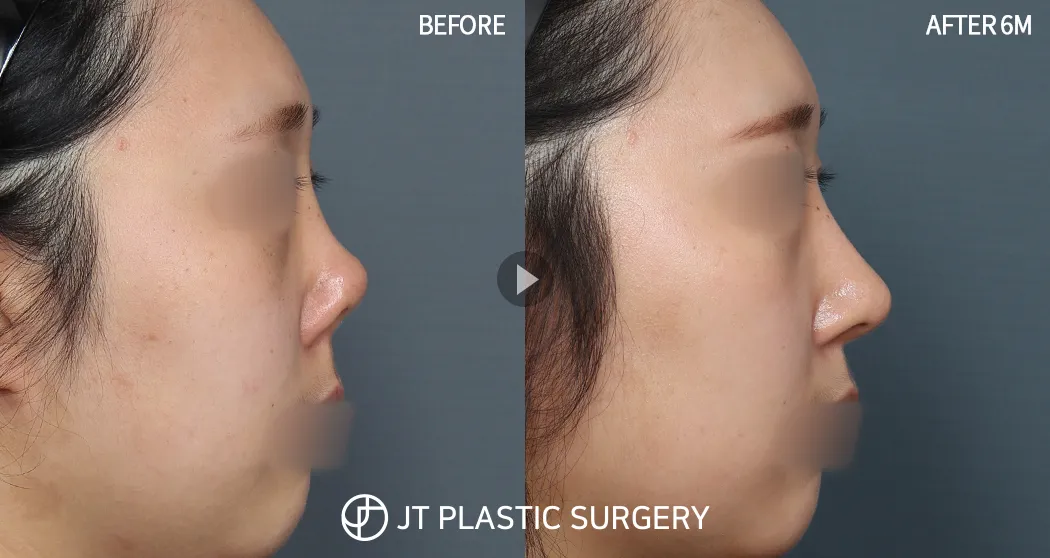
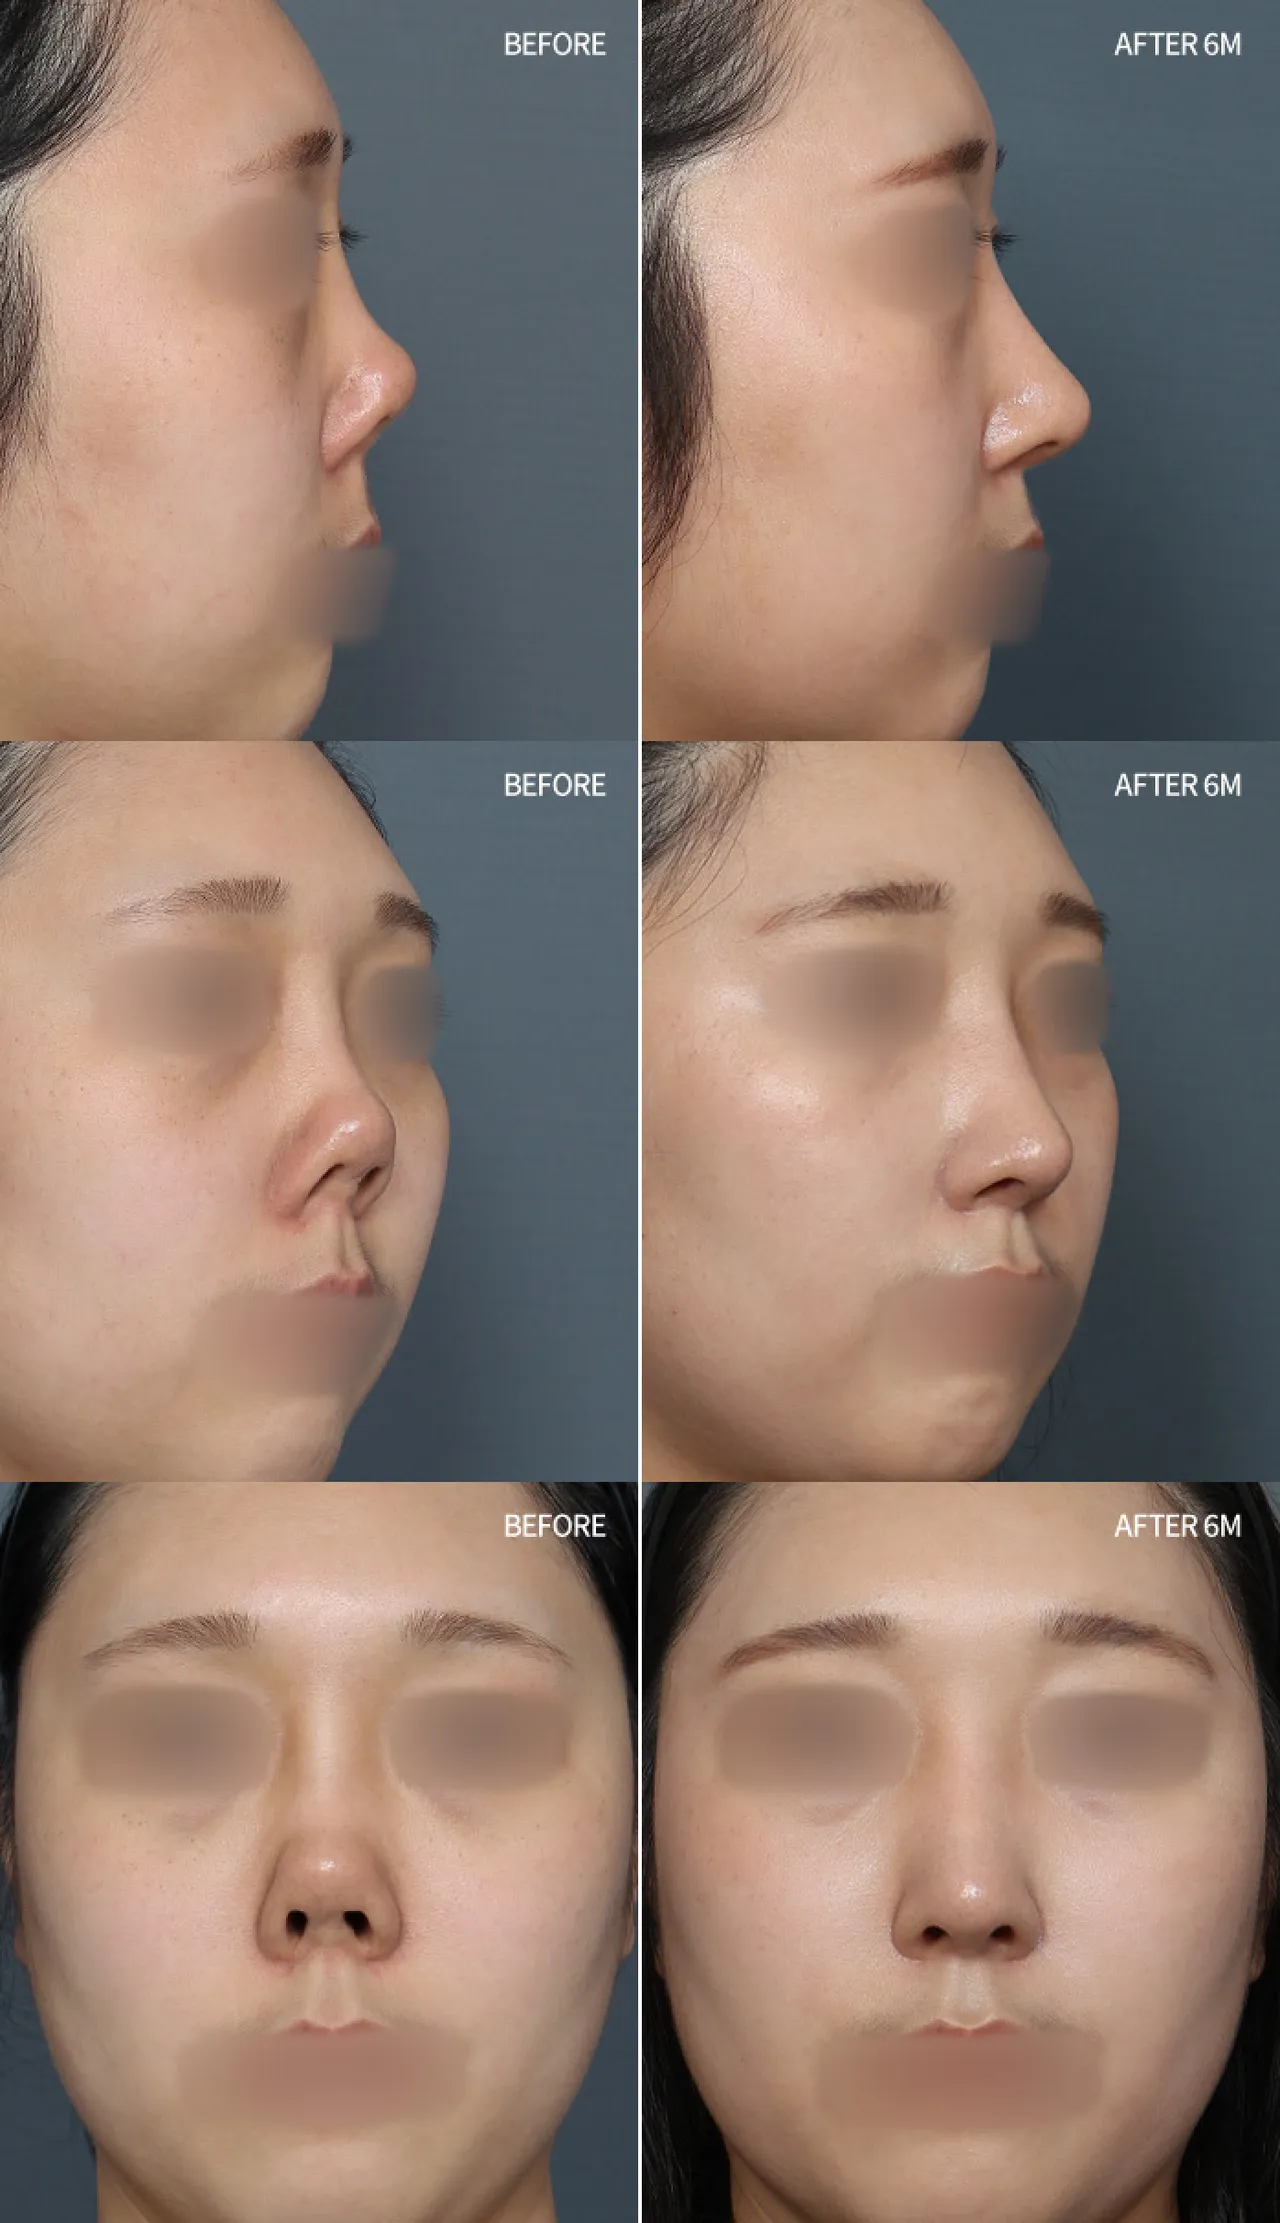
Rhinoplasty Revision (Autologous Rib Cartilage) + Contracted Nose, 6 months after surgery
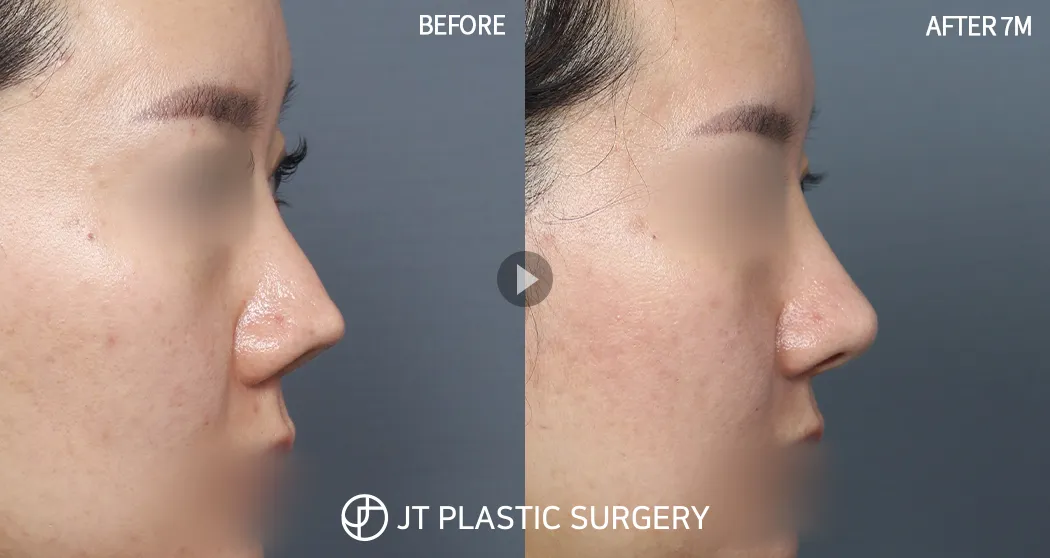
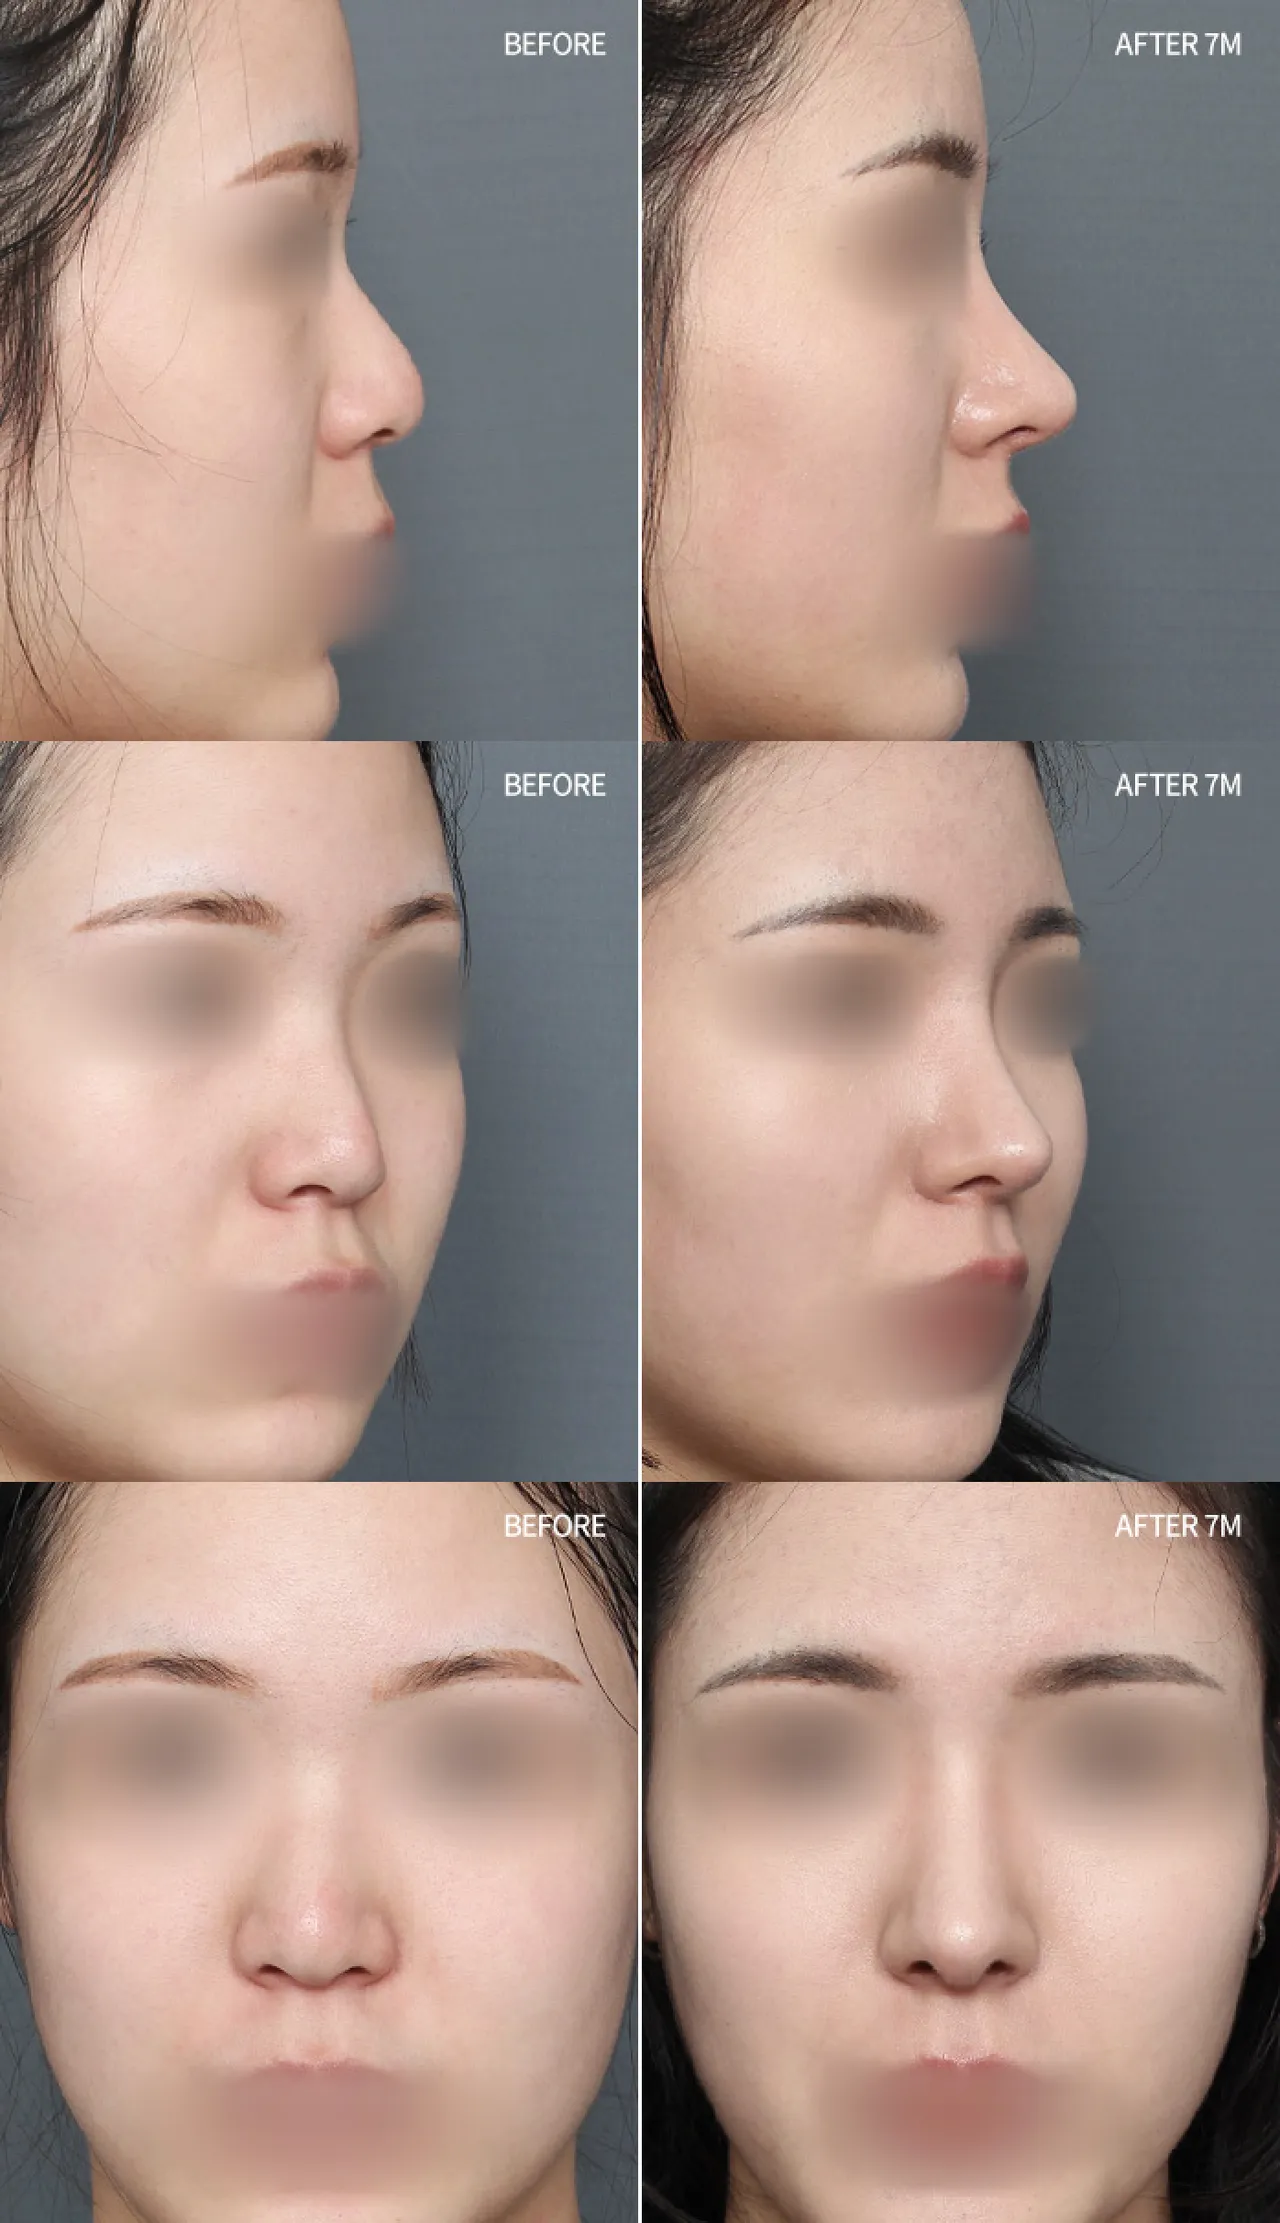
Rhinoplasty Revision + Contracted Nose + Short Nose + Functional Rhinoplasty, 7 months after surgery
03 Dorsal Hump Correction Revision
Fundamentally addressing the structure according to the cause of the residual dorsal hump, even after correction

✓ Surgery time: approximately 2 hours
✓ Anesthesia: sedation/local anesthesia
✓ Hospitalization: not required
✓ Suture removal: approximately 7 days later
✓ Follow-up visits: approximately 1–2 times
✓ Return to daily activities: approximately 7 days later
JT YOUTUBE
Accurate plastic surgery information through videos
JT Hump Nose Revision Surgery
After Hump nose surgery, some people may feel over time that “the hump seems to have returned.”라고 느끼는 분들이 있습니다.
However, it is extremely rare for nasal bone or cartilage to grow back and form a hump.
In most cases, the structure causing the hump was not sufficiently corrected during the initial surgery, or an uneven line becomes apparent because the balance was not properly restored after resection.
Hump nose revision surgery is not simply a procedure to smooth the surface; it must address the underlying cause of the hump.
JT Diagnostic Criteria for Hump Nose Revision Surgery
❶ Analyze the remaining structural cause of the hump through CT imaging
❷ Check whether the line appears interrupted or angulated depending on the viewing angle
❸ Assess whether the Nasal Bridge appears wide from the front or whether there is nasal dorsum depression
❹ Check for a step-off at the nasal dorsum–nasal tip junction or saddle nose
Solutions for Hump Nose Revision Surgery by Cause
❶ When the cartilaginous hump has not been sufficiently refined
The cartilaginous portion of a hump is shaved or rasped. Because cartilage has some elasticity, if it is not sufficiently refined, it may appear improved immediately after surgery while hidden by swelling, but an uneven line may become visible over time.
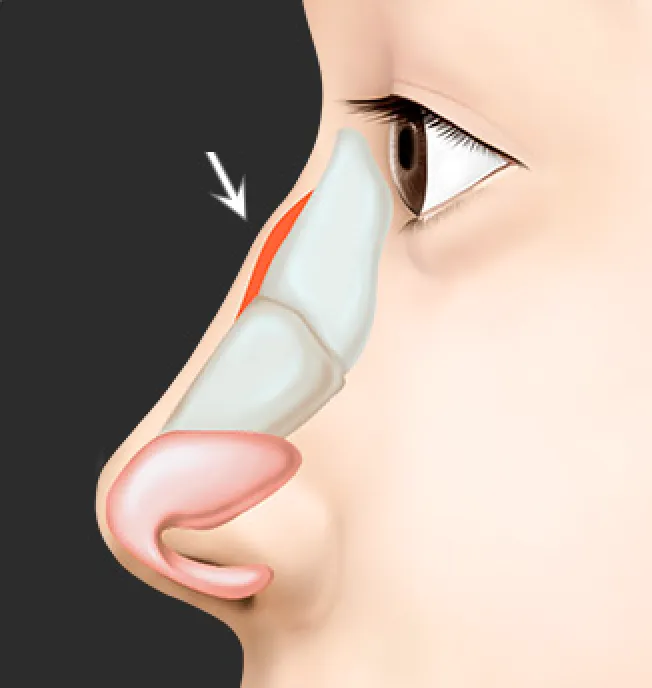
Solution: Thoroughly shave and refine the remaining cartilaginous hump.
❷ When the line connecting to the nasal tip is not smooth and a step-off has developed
After refining a hump, the connecting line to the nasal tip must be smoothly contoured. Reinforcement may be needed to prevent a step-off when necessary; if this delicate work is insufficient, a step-off and irregularities may occur.
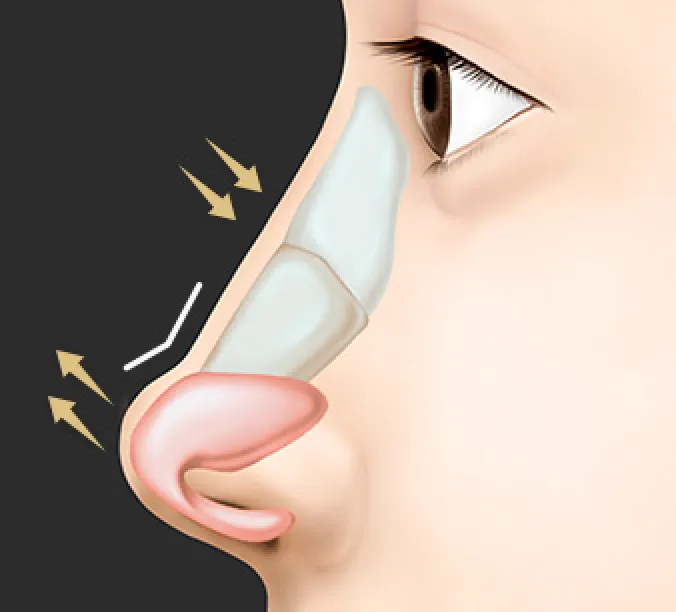
Solution: Reinforce the area with the step-off using Autologous Tissue, or if needed, readjust the height of the Nasal Bridge Implant or nasal tip.
❸ When excessive removal causes a step-off or makes the Nasal Bridge appear wide
Excessive hump removal can create a wide gap in the nasal bone, resulting in an open roof phenomenon where the Nasal Bridge appears wide and spread.
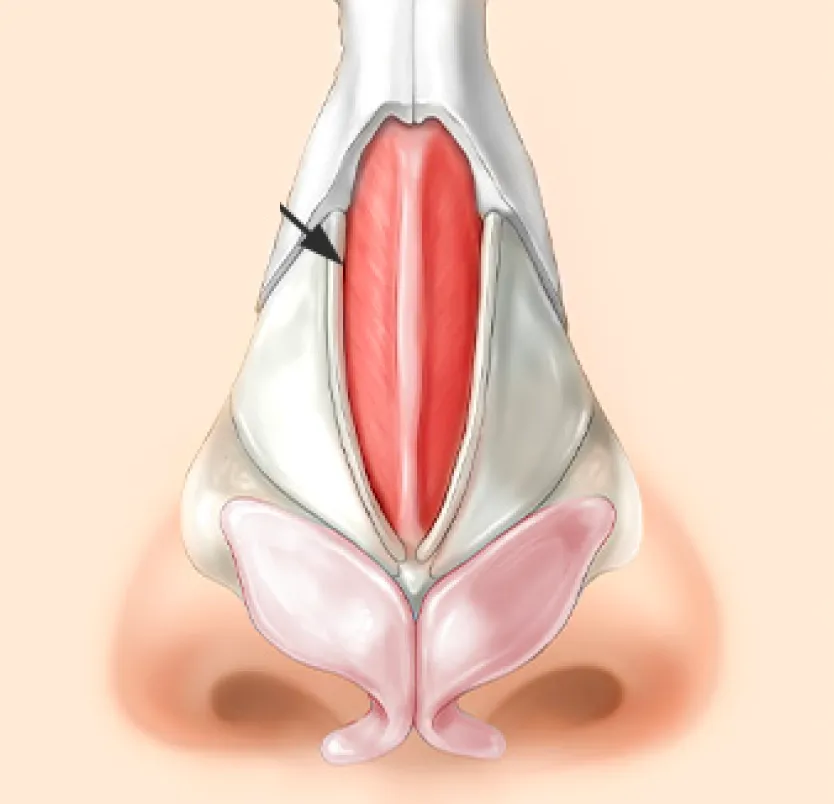
Solution: Approximate the nasal bones through Genioplasty to close the open roof, and use an overlay graft (Spreader graft) to bring the cartilage together. If necessary, use a Silicone Implant or Autologous Tissue to supplement height and volume.
❹ When only the surface was refined and structural osteotomy was insufficient
For a Hump nose with large, wide nasal bones, nasal bone osteotomy should also be performed while refining the visibly protruding hump. Otherwise, the Nasal Bridge may appear wide, a step-off may develop, or it may look like a hump from the side.
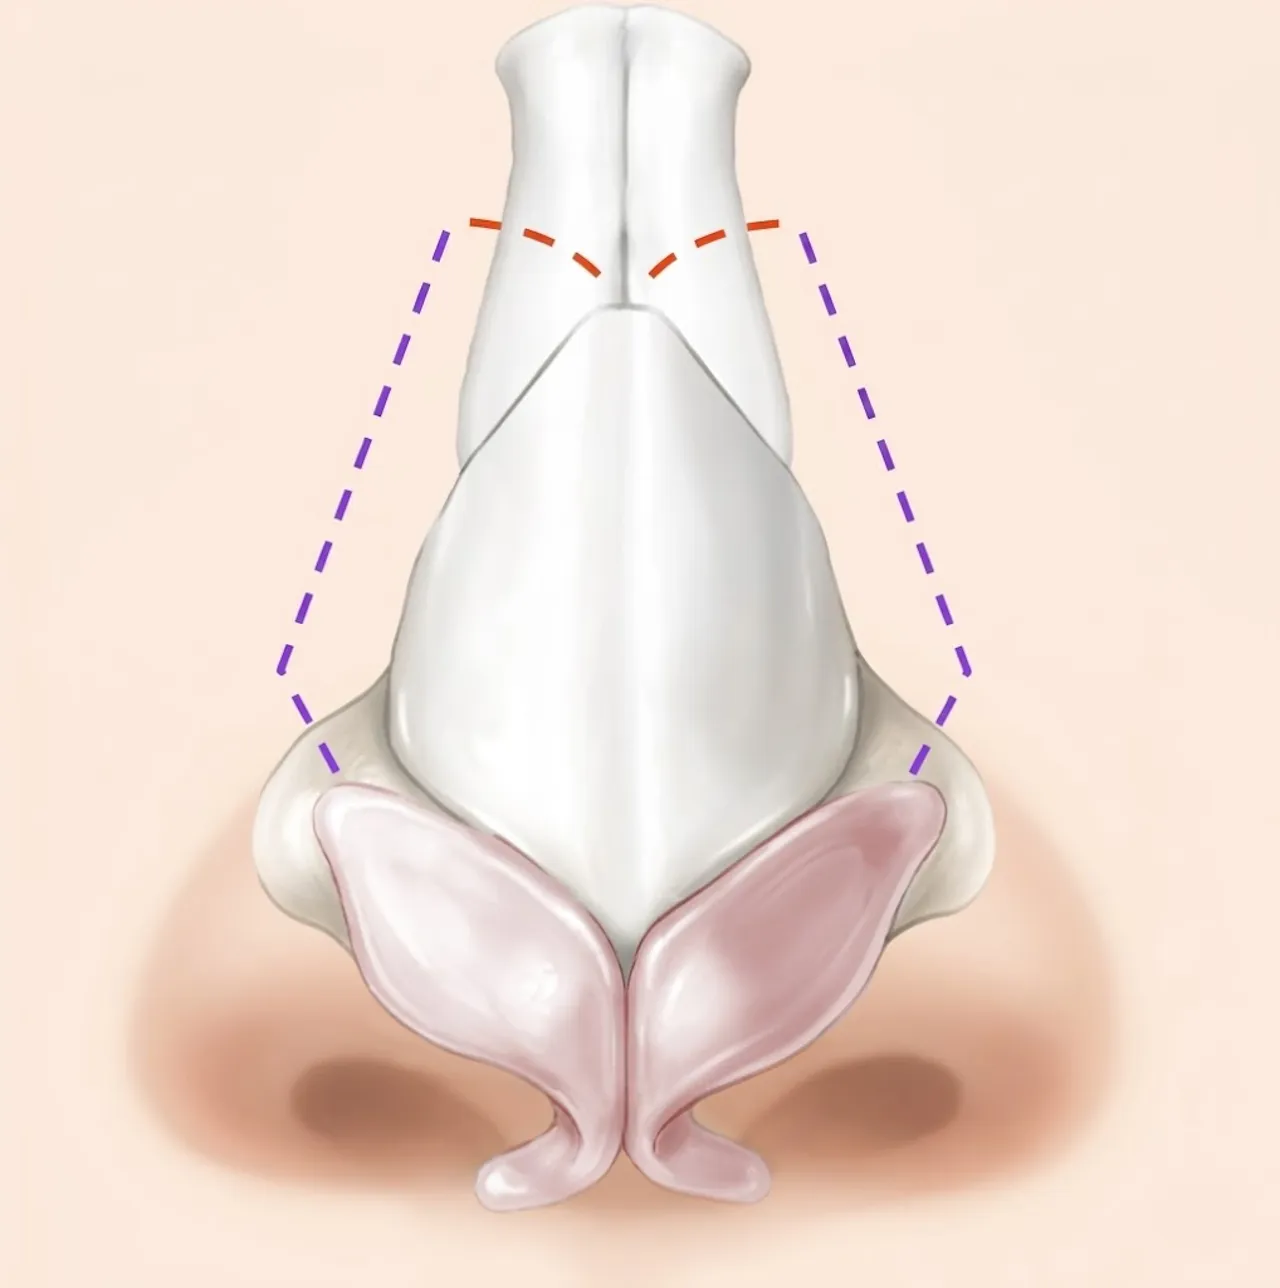
Solution: Perform nasal bone osteotomy to balance the Nasal Bridge and create a smooth line.
Actual Hump Nose Revision Surgery Cases
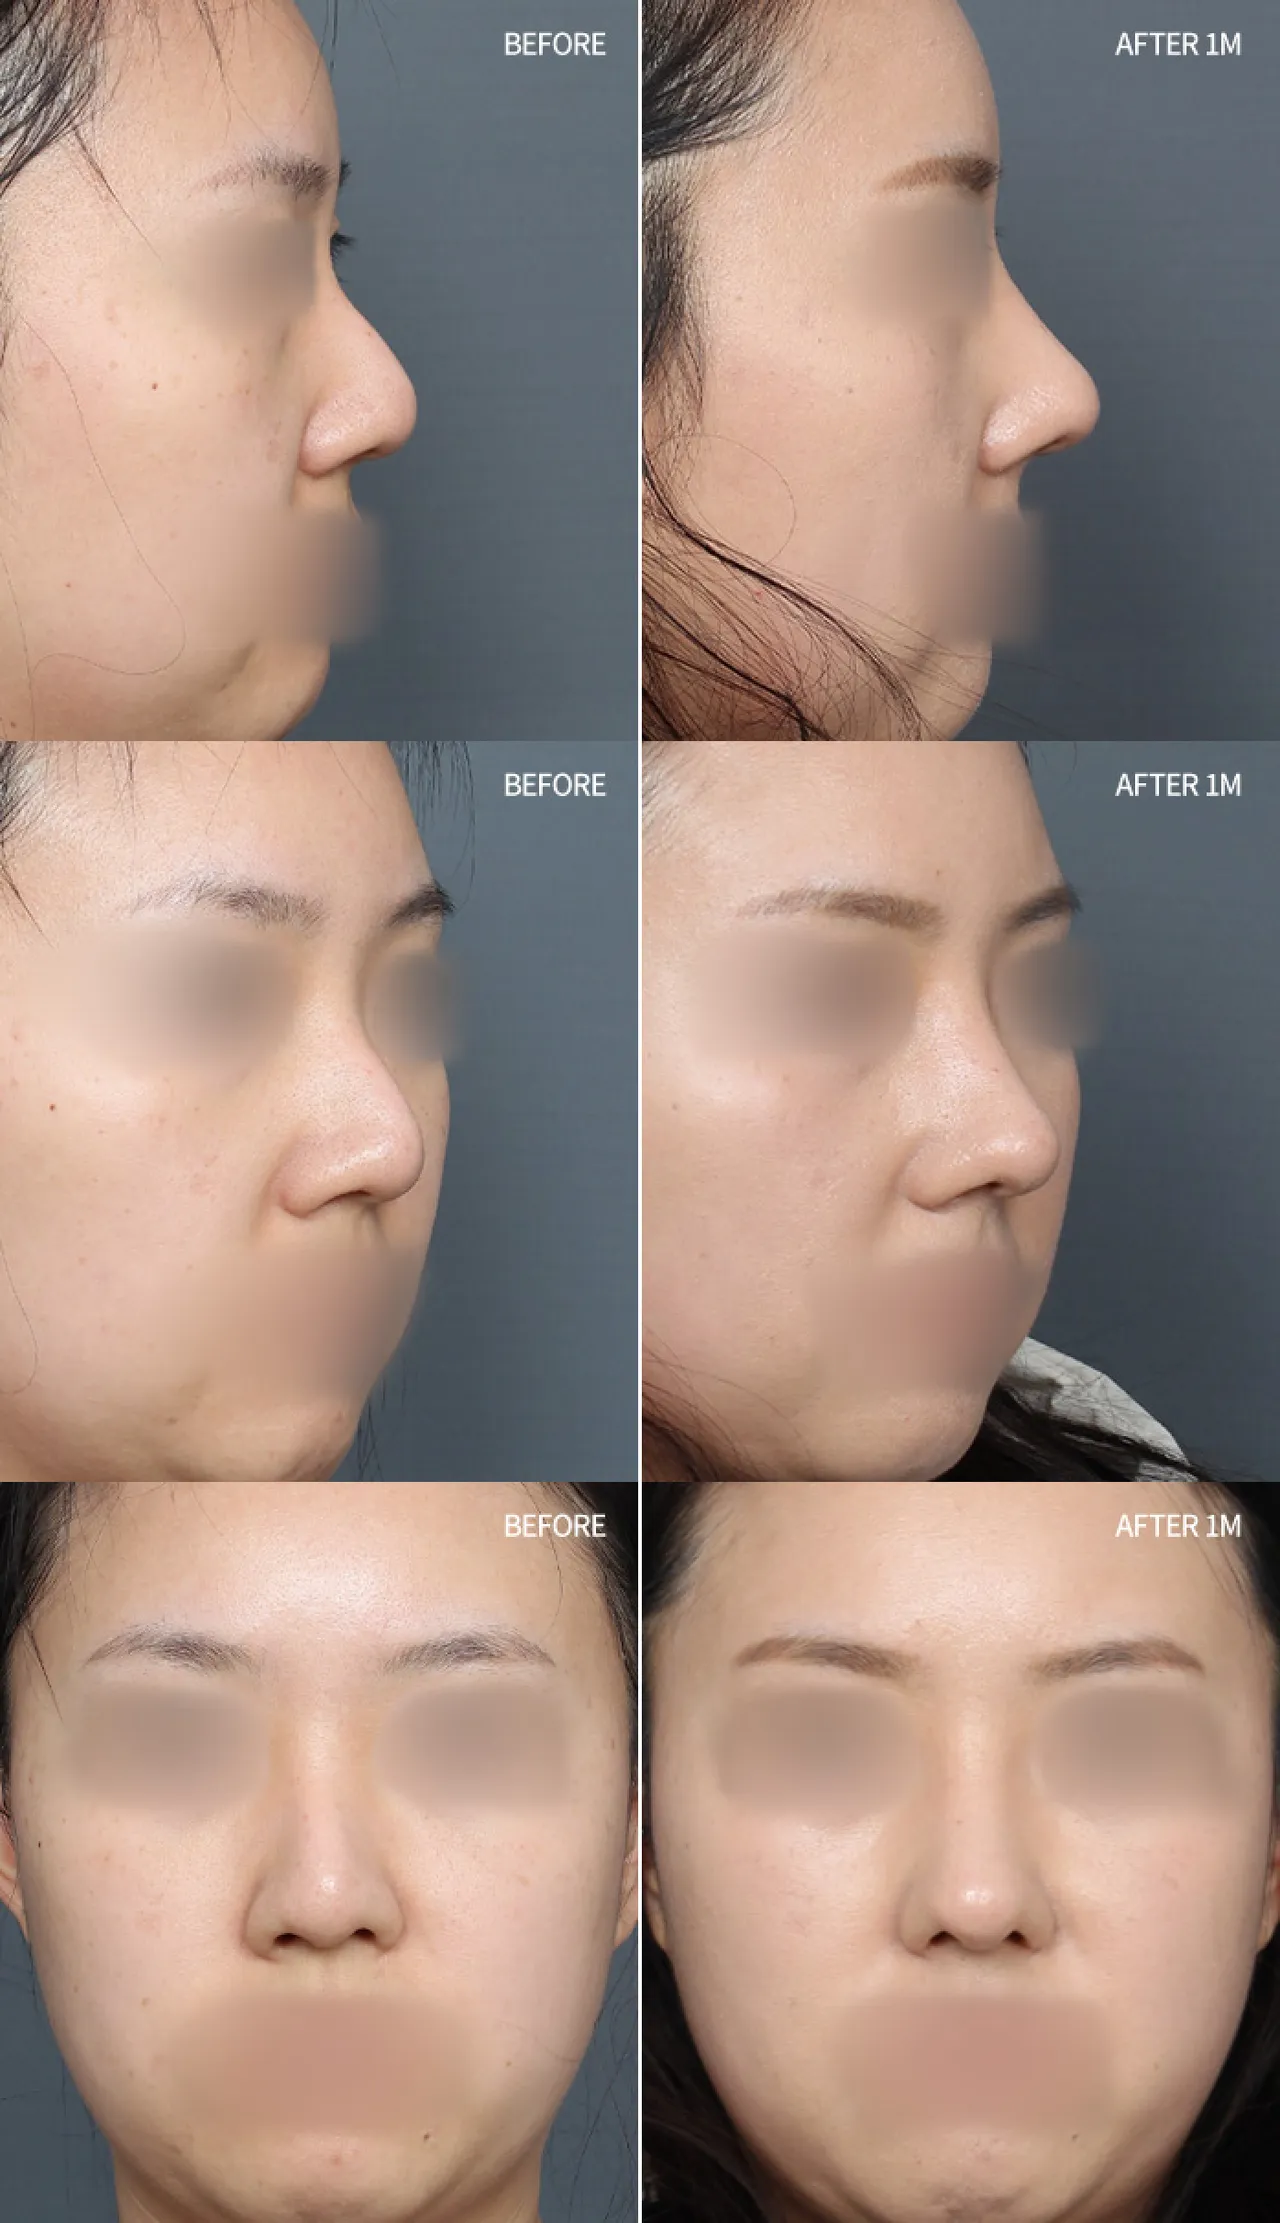
Case 01 Doctor's Note
After closed rhinoplasty before visiting our clinic, the hump had not been sufficiently corrected, leaving a residual hump. Reduced nasal tip support and Implant displacement made the dorsal hump appearance more prominent. During revision surgery, the residual hump was precisely refined, the Implant was replaced, and the nasal tip support structure was strengthened to stably improve the lateral profile.
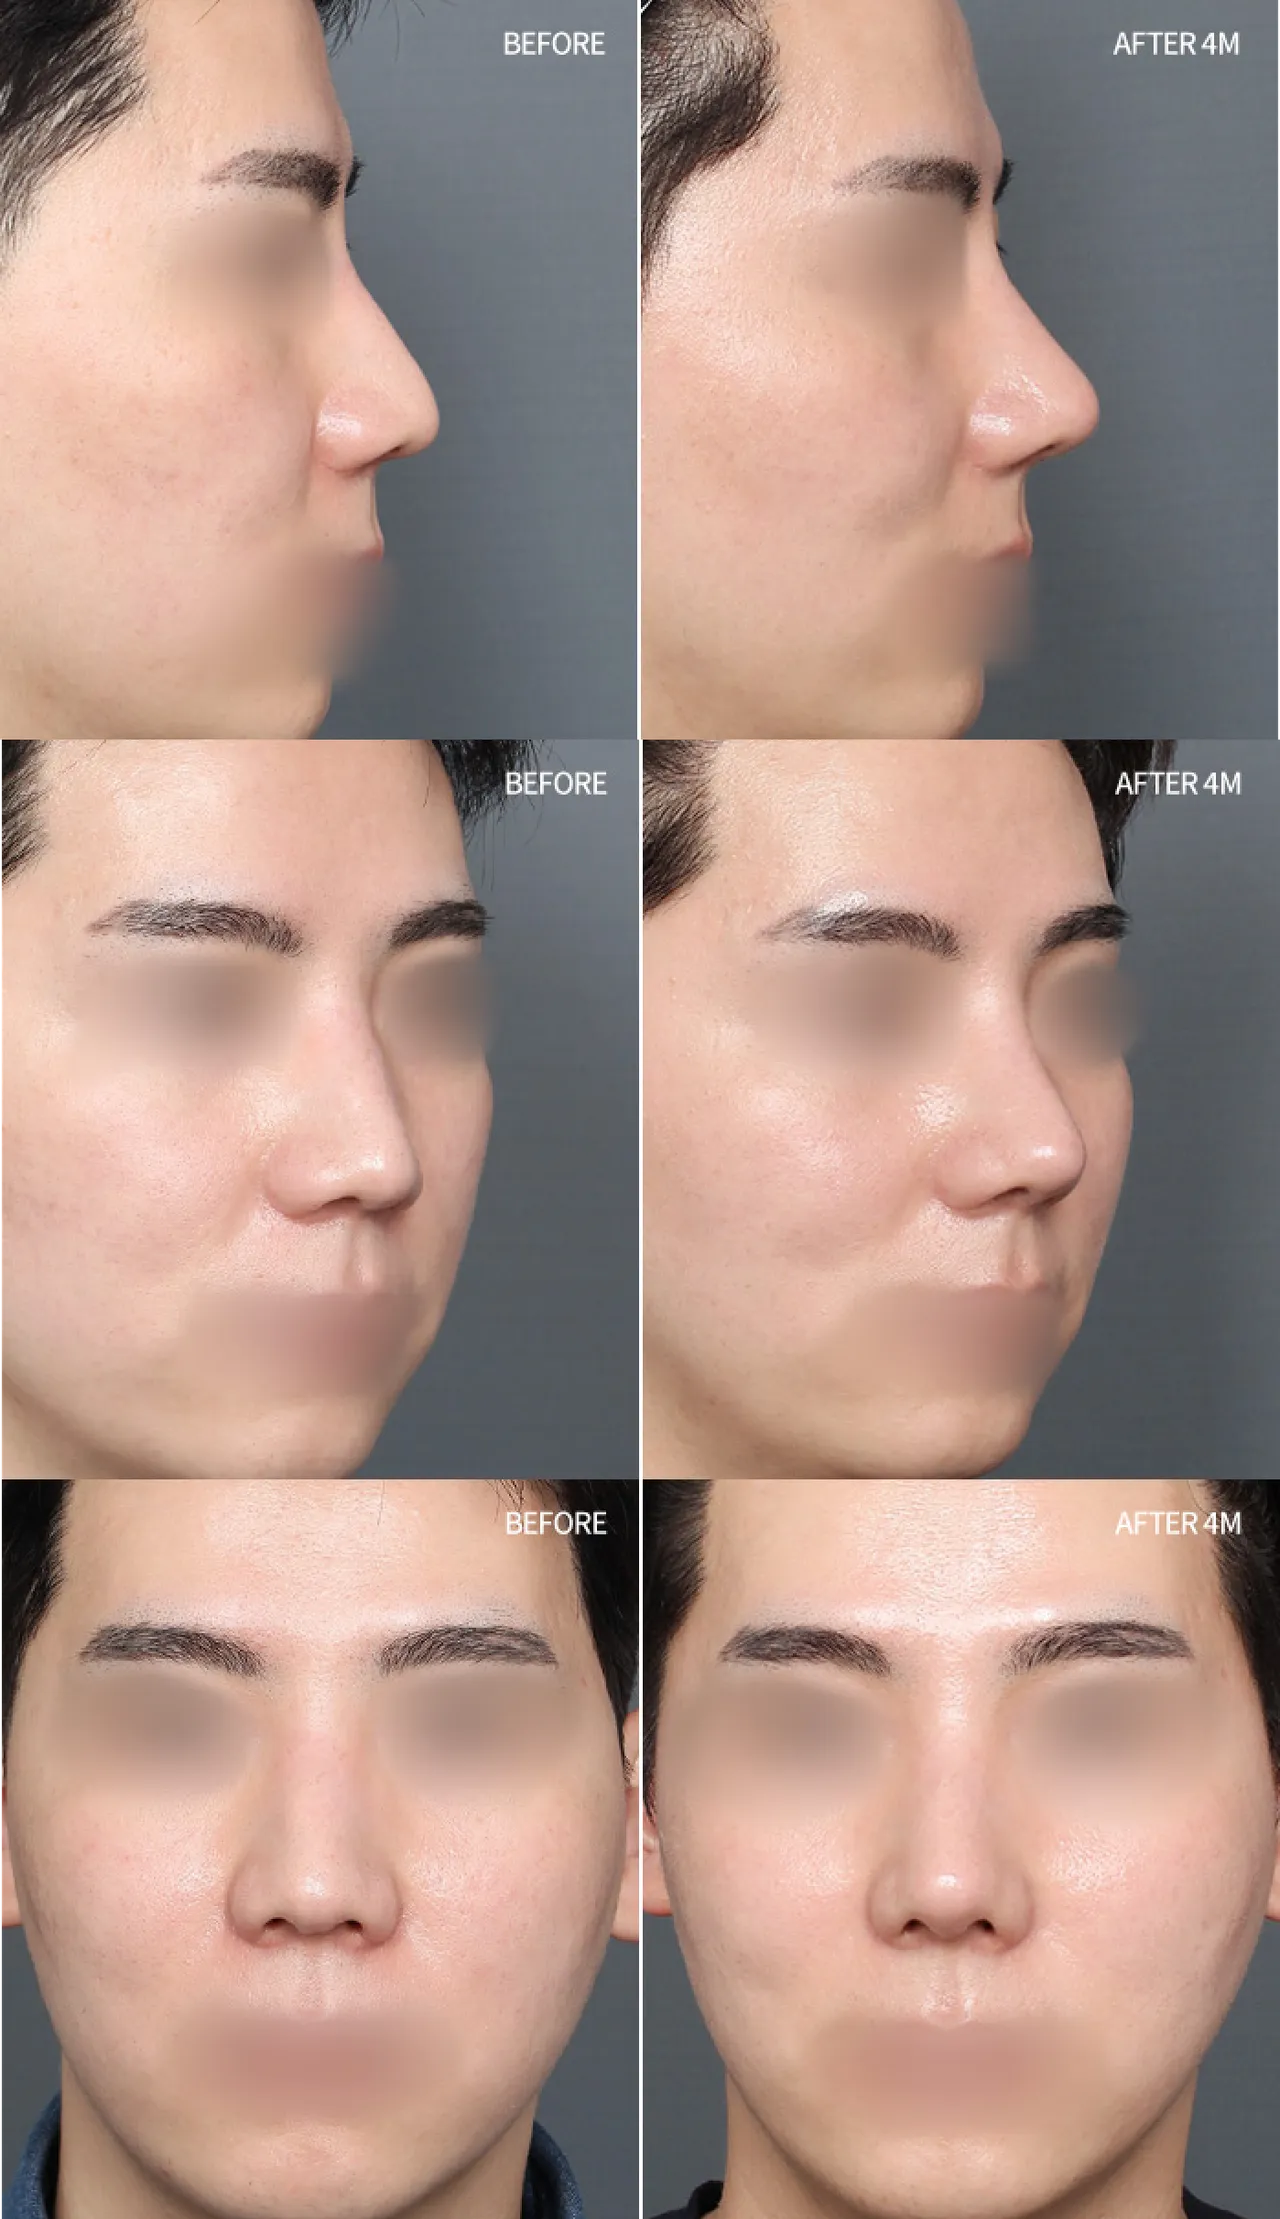
Case 02 Doctor's Note
Before visiting our clinic, only closed nasal bone surgery had been performed, so the Nasal Bridge hump was not sufficiently corrected, and insufficient nasal tip support made the nose appear low and spread. During revision surgery, the Nasal Bridge hump was refined, the wide Nasal Bridge was narrowed through osteotomy, and Rib Cartilage was used to support the Columella and elevate the nasal tip. As a result, the wide-looking Nasal Bridge and spread nasal tip improved, creating a dimensional straight nasal line.
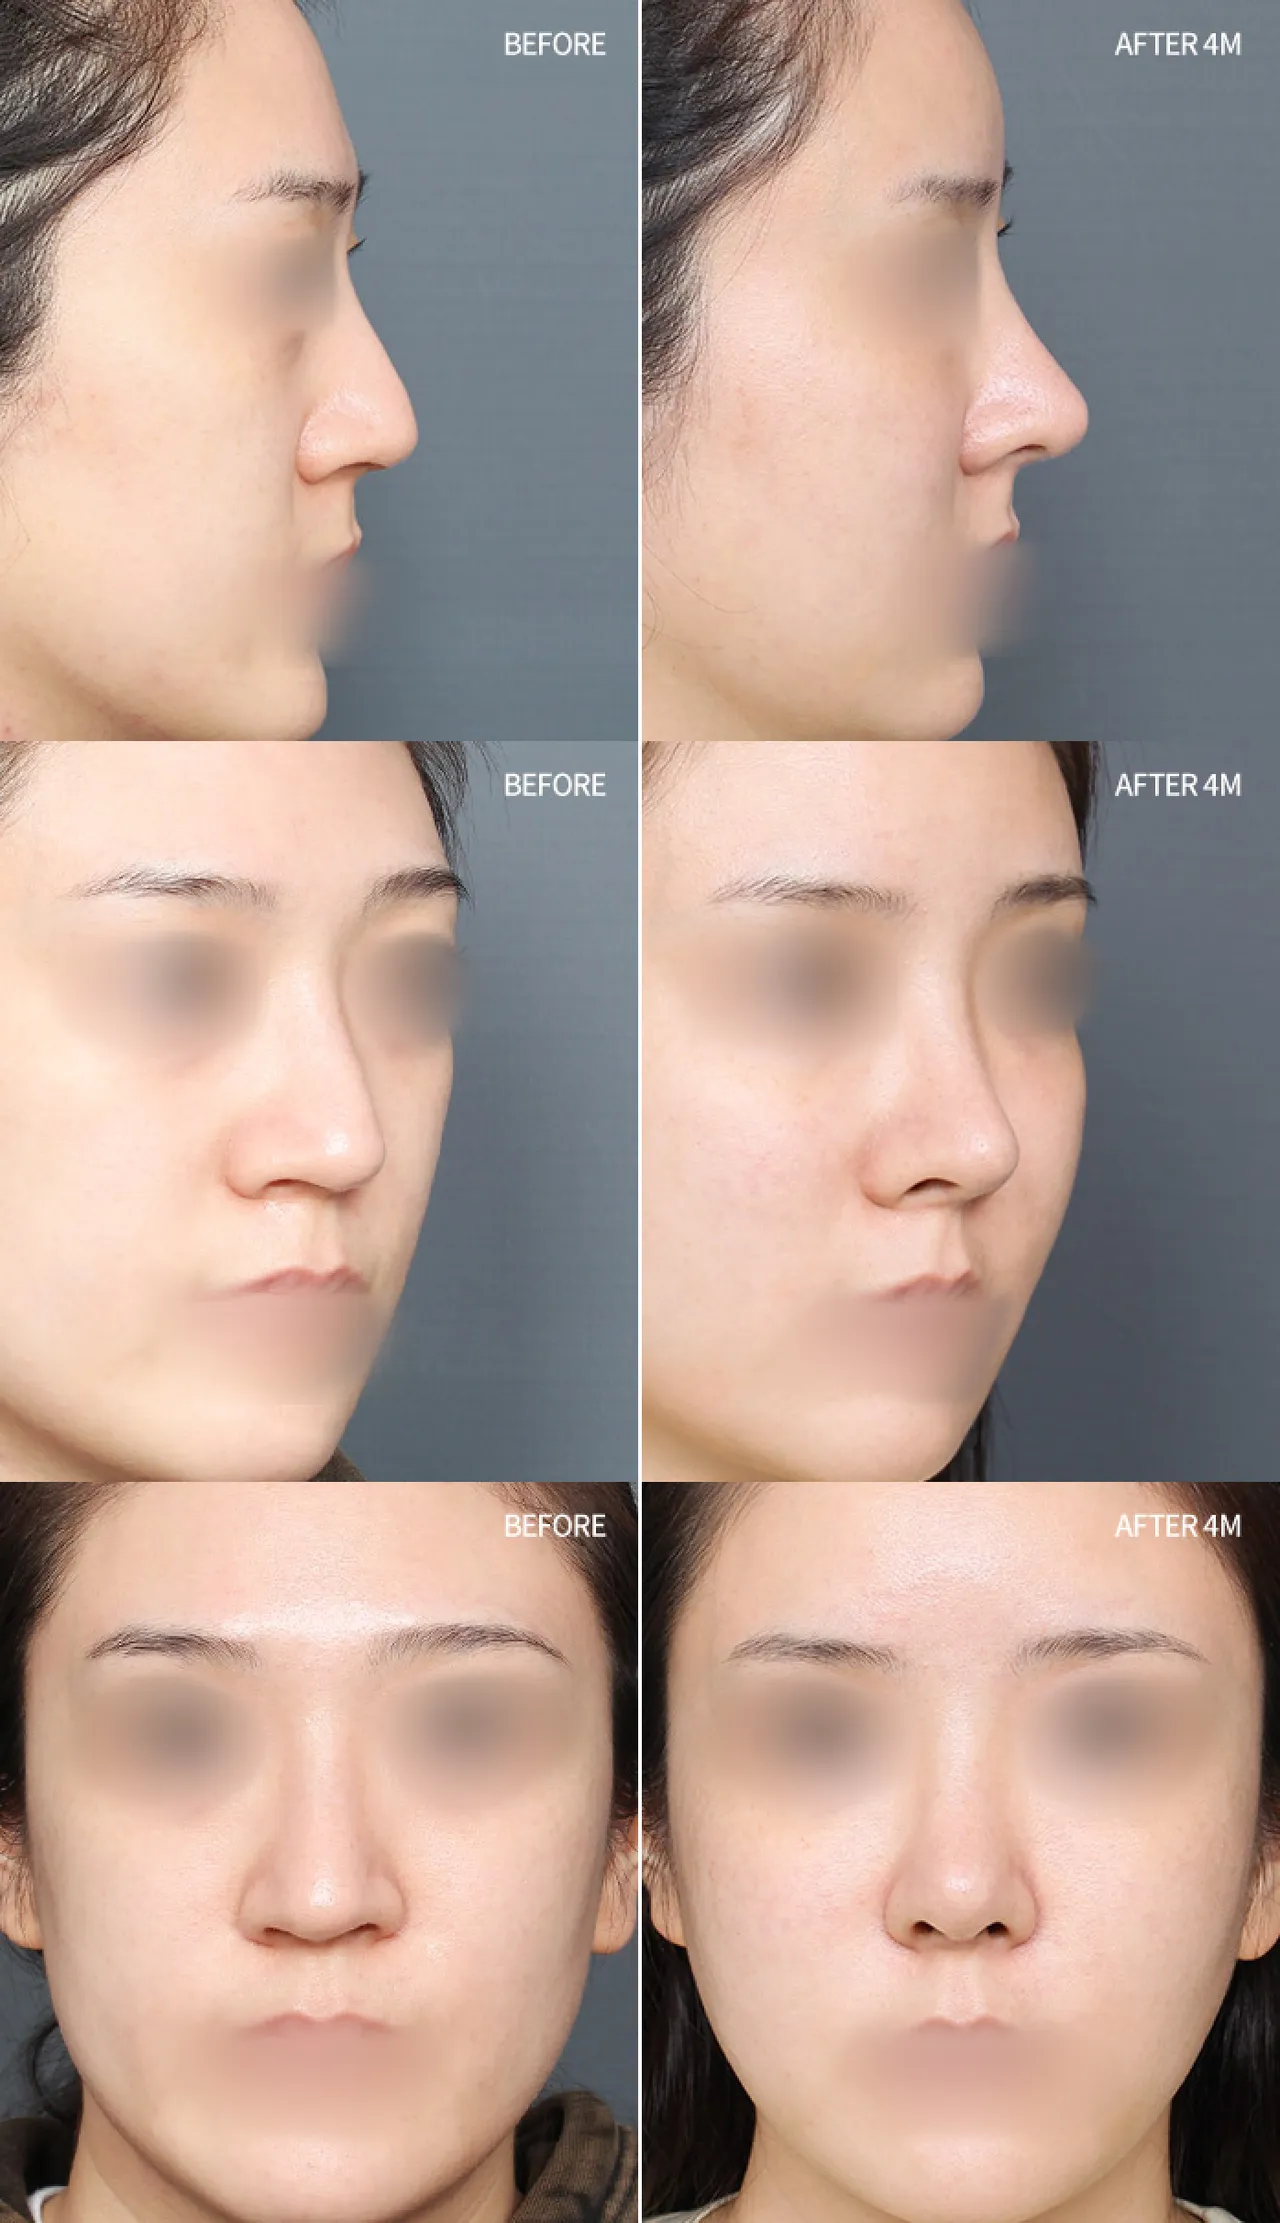
Case 03 Doctor's Note
There was a history of nasal tip and hump correction using existing Septal Cartilage, but the patient had nasal tip drooping, Columella depression, and a Nasal Bridge–nasal tip step-off due to weakened septal support. After removing calcified Septal Cartilage, septal extension was performed using Donor Rib Cartilage, Ear Cartilage was grafted to the nasal tip, the hump was refined, and a 1 mm Silicone implant was used to correct the Nasal Bridge–nasal tip step-off. As a result, the hump was well corrected, the balance between the Nasal Bridge and nasal tip improved, and the Columella position was stably corrected.
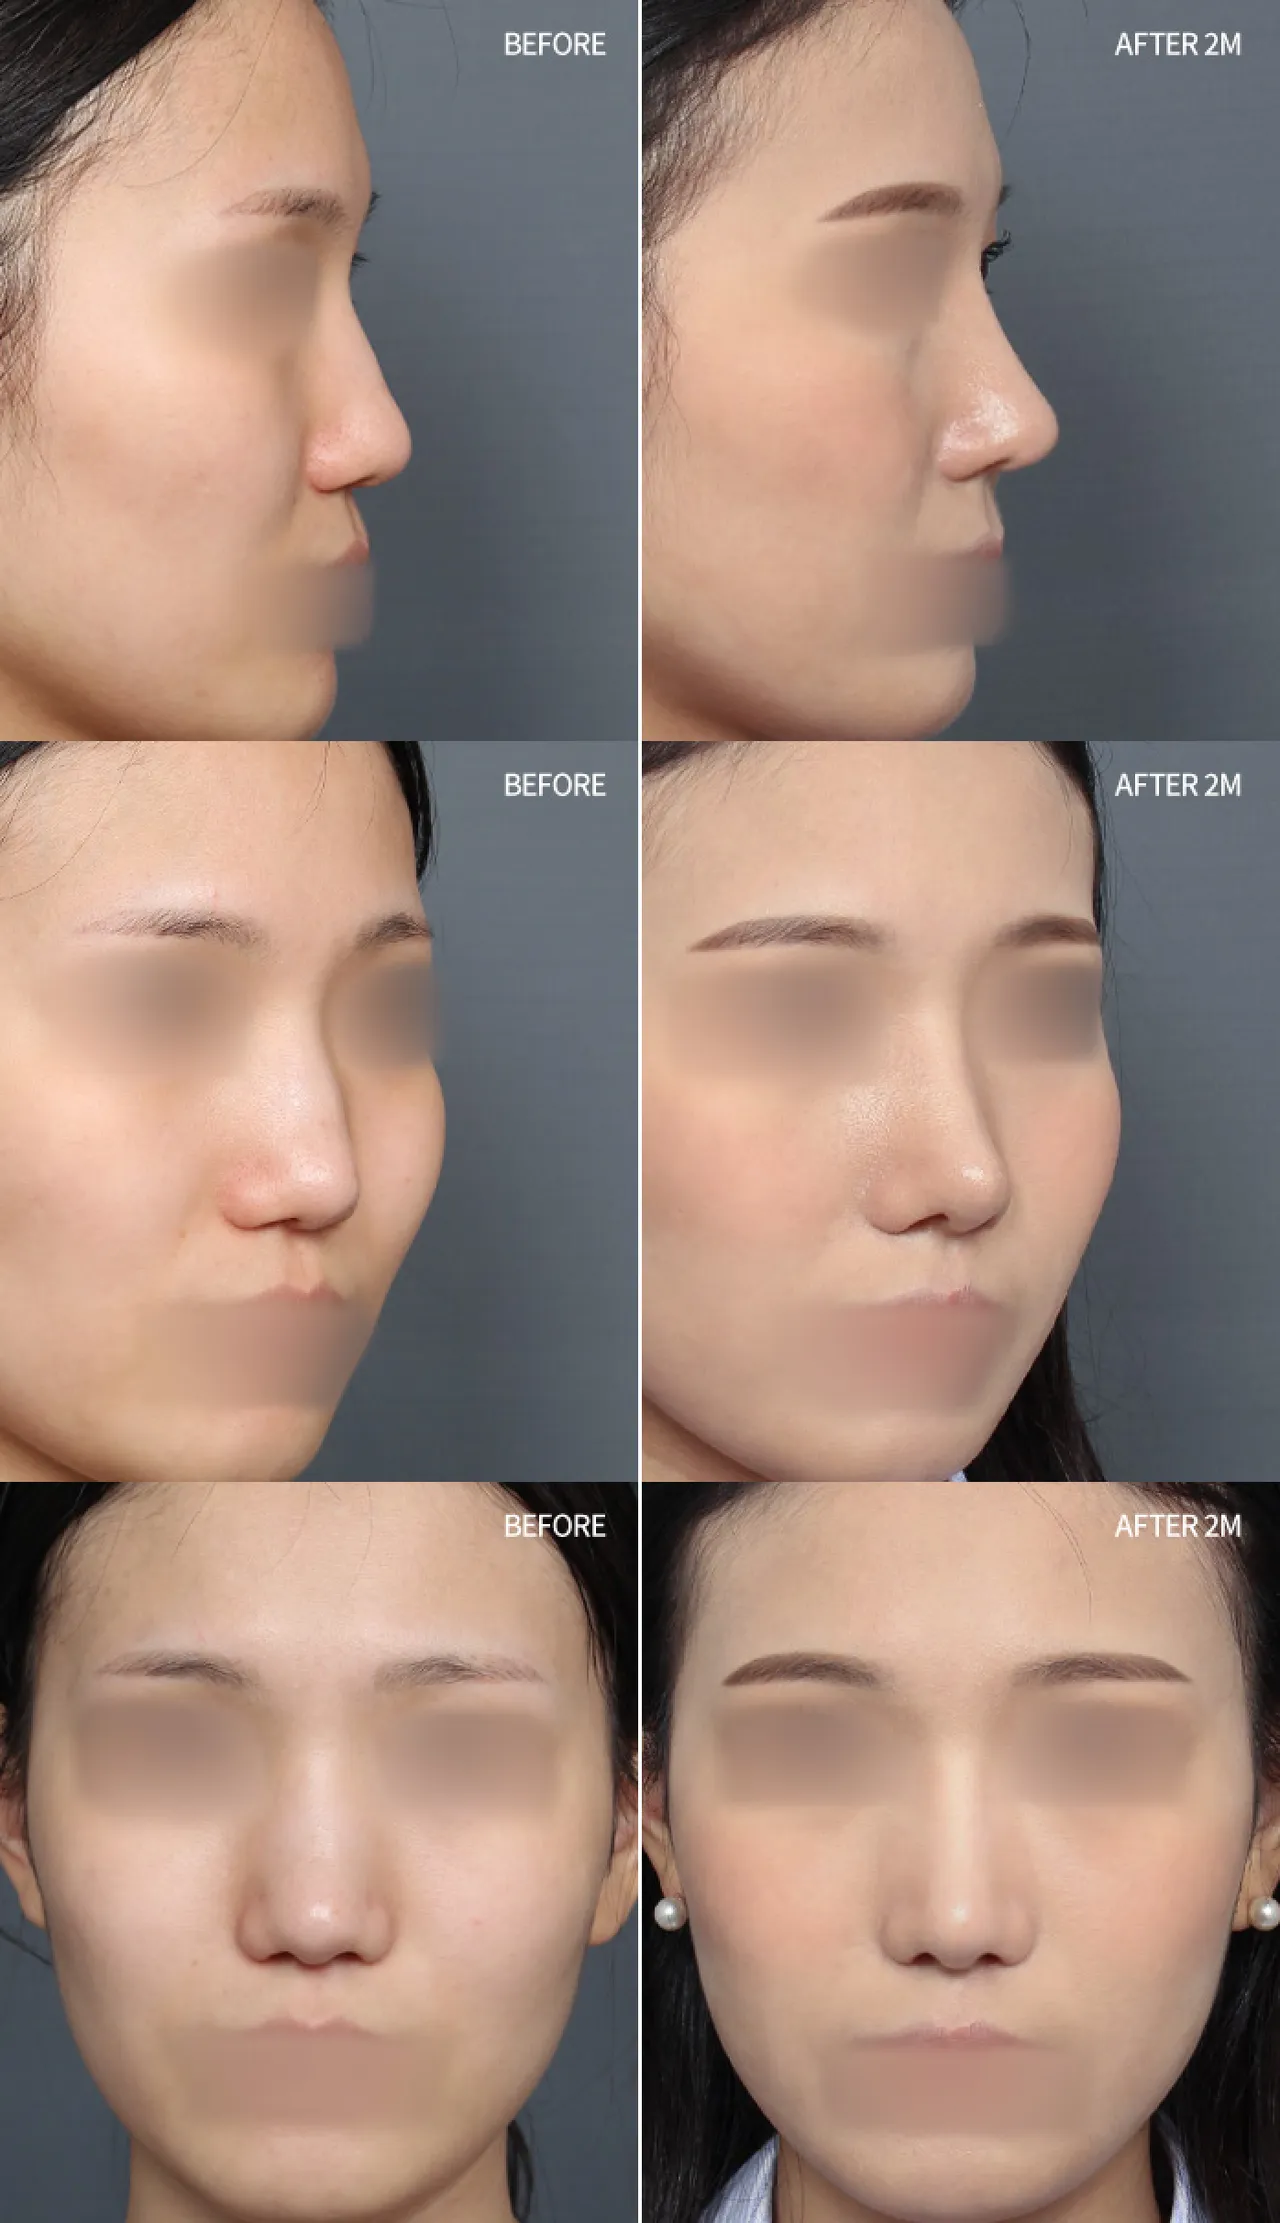
Case 04 Doctor's Note
There was a history of previous hump resection, but the patient wanted to improve a curved lateral line, a wide-looking Nasal Bridge, and a low, drooping nasal tip. Septal extension using Septal Cartilage, Ear Cartilage, and Donor Rib Cartilage, along with osteotomy and an appropriate Implant, corrected the Nasal Bridge–nasal tip step-off. As a result, the Nasal Bridge width improved and dimension was restored from the front, while the side profile was refined into a straight, slightly curved line.
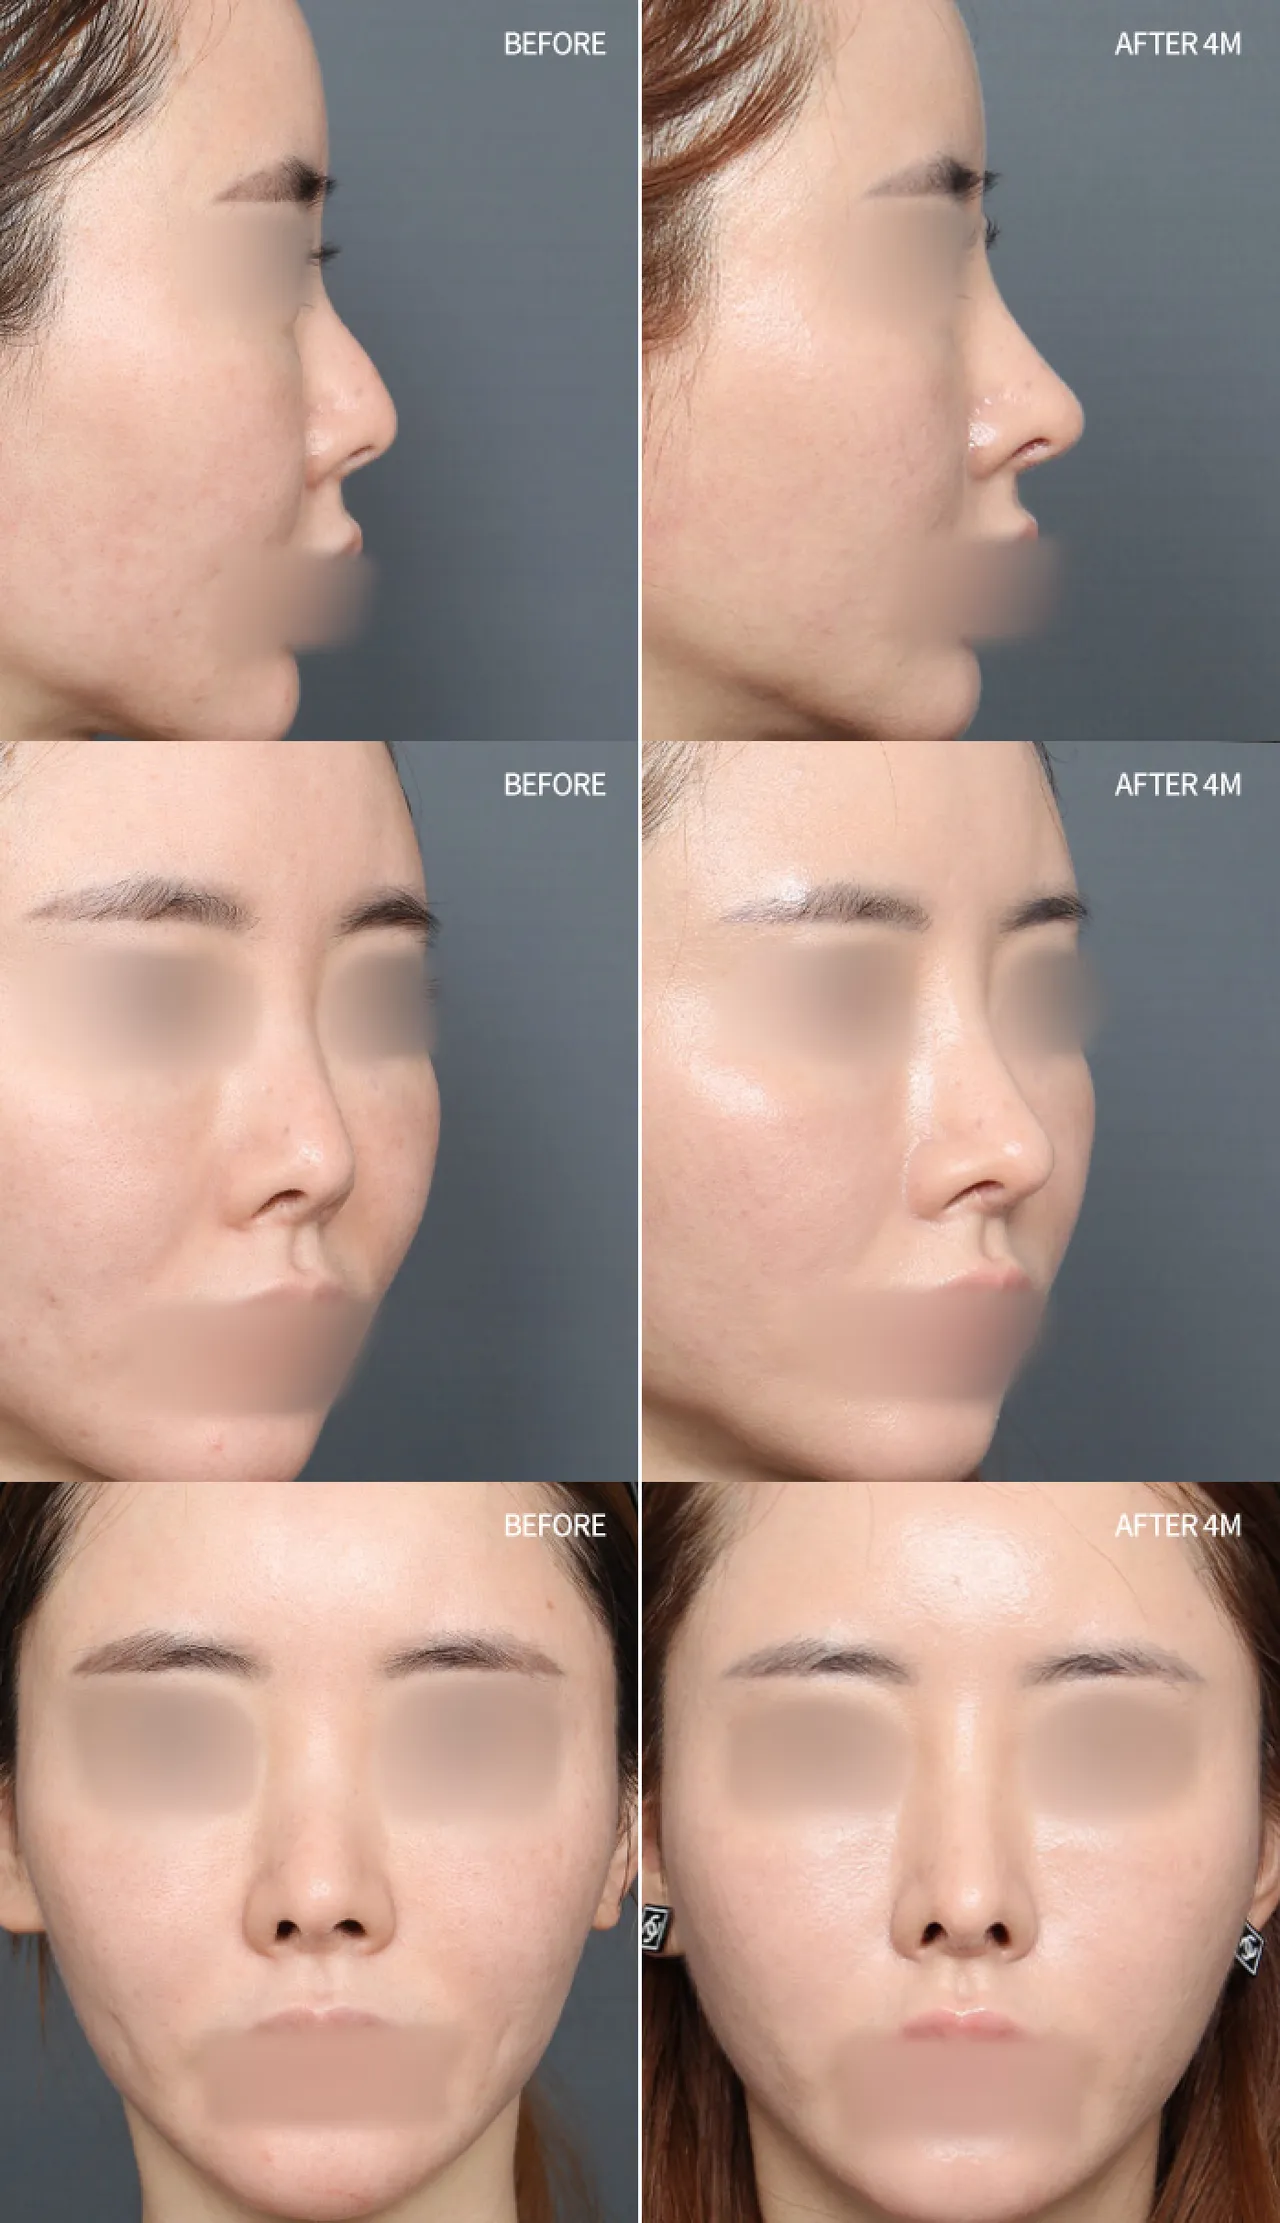
Case 05 Doctor's Note
After previous rhinoplasty, hump correction had not been sufficiently performed, leaving an irregular nasal dorsum line. During revision surgery, septal extension using Rib Cartilage strengthened, lengthened, and reconstructed nasal tip support, and after precise resection of the residual hump, the nasal dorsum line was smoothly corrected with a Silicone Implant.
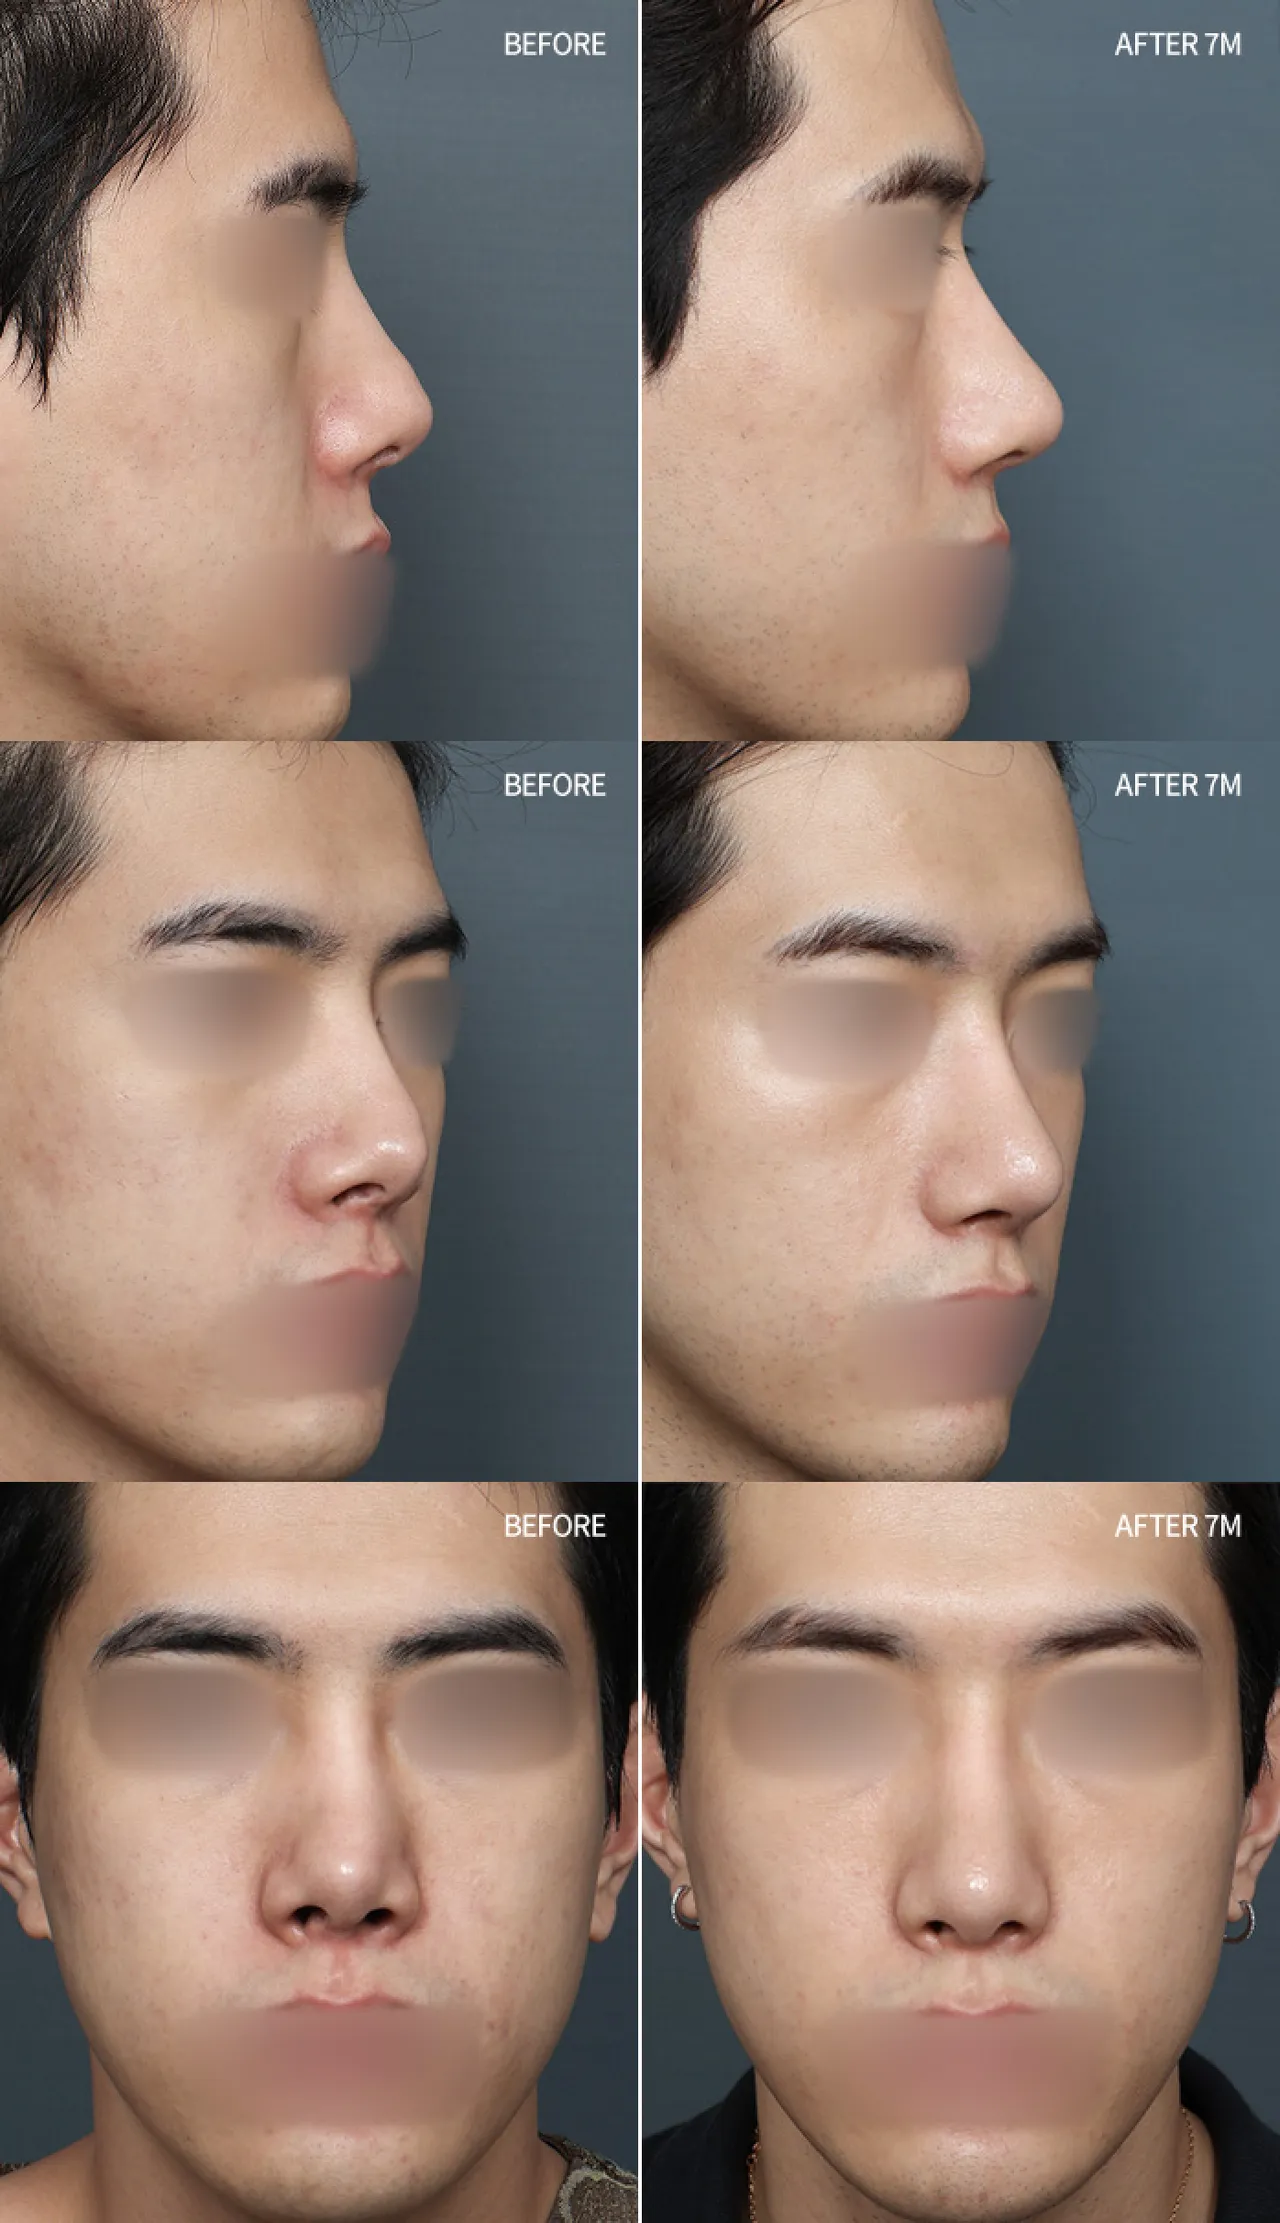
Case 06 Doctor's Note
Although osteotomy had been performed during previous rhinoplasty, the left-right balance was uneven and the nasal alignment was off, making the nose appear crooked from the front and the Nasal Bridge appear uneven from the side. During revision surgery, the Silicone Implant was replaced and its starting point lowered, while an overlay graft (Spreader graft) was used to correct the Crooked Nose and restore bilateral symmetry. Septal extension using Autologous Rib Cartilage also corrected deviation of the nasal tip and Columella. As a result, both frontal symmetry and the lateral line were stably restored.
BEFORE & AFTER
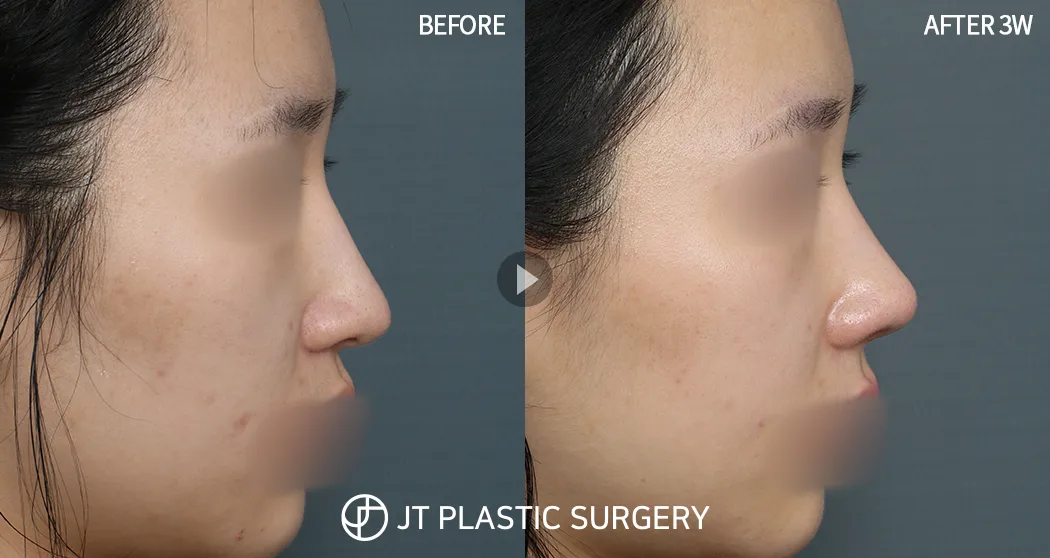
Rhinoplasty Revision (Autologous Rib Cartilage) + Hump Reduction + Long Nose Correction + Crooked Nose Correction, 3 weeks after surgery
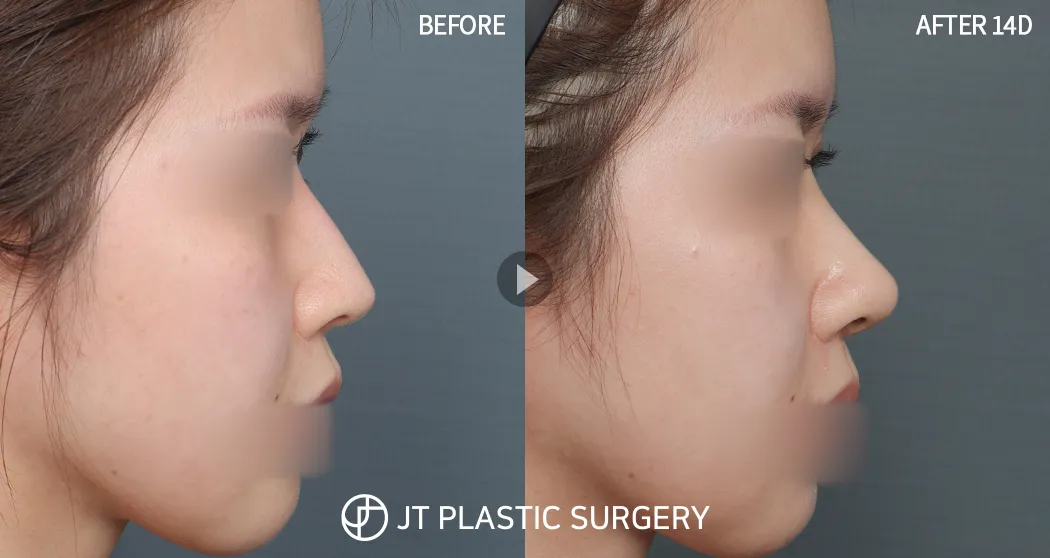
Rhinoplasty Revision (Autologous Rib Cartilage) + Hump Reduction + Long Nose Correction + Columella Lengthening, 2 weeks after surgery
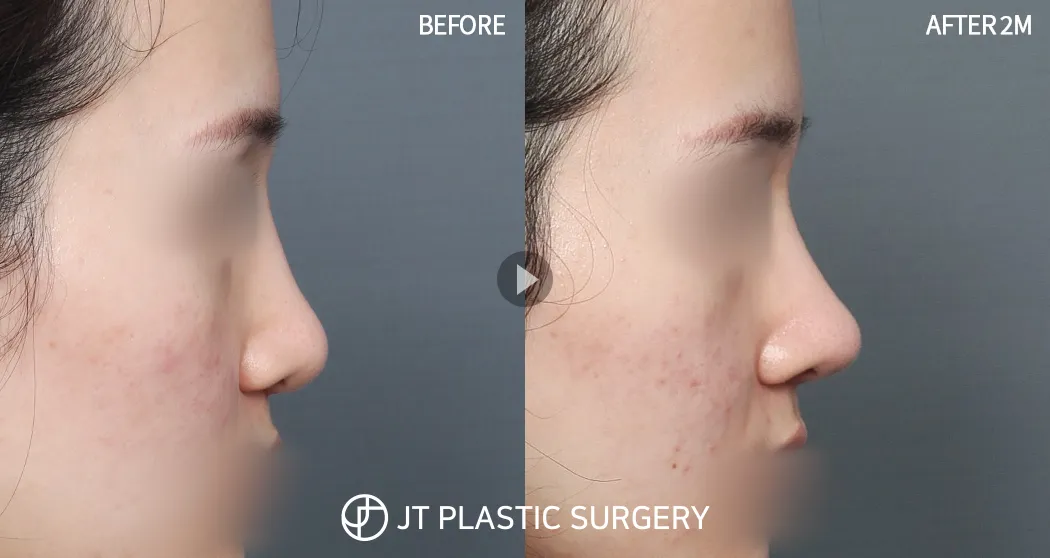
Rhinoplasty Revision (Autologous Rib Cartilage) + Crooked Nose + Wide Nose + Hump + Columella Elevation, 2 months after surgery
JT RHINOPLASTY SPECIAL POINTS
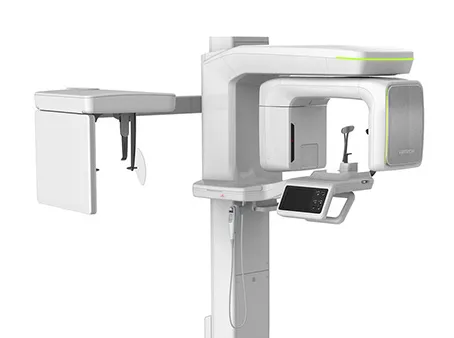
Point ❶ 3D-CT Analysis Rhinoplasty
More precise diagnosis and surgery are possible based on 3D-CT imaging before rhinoplasty.
01 Check nasal bone deviation and width
02 Analyze septal shape and size
03 Diagnose functional nasal problems
04 Check the condition and shape of existing Implants
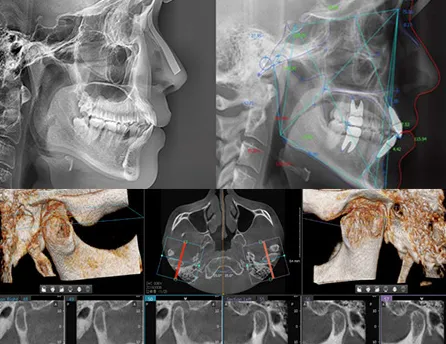
Accurate consultation and surgical planning based on precise 3D-CT analysis lead to more satisfactory surgical outcomes. This is possible through the expertise of JT’s medical staff.
Point ❷ Customized Rhinoplasty Just for You

We pursue beautifully customized rhinoplasty that harmonizes with your one-and-only face.
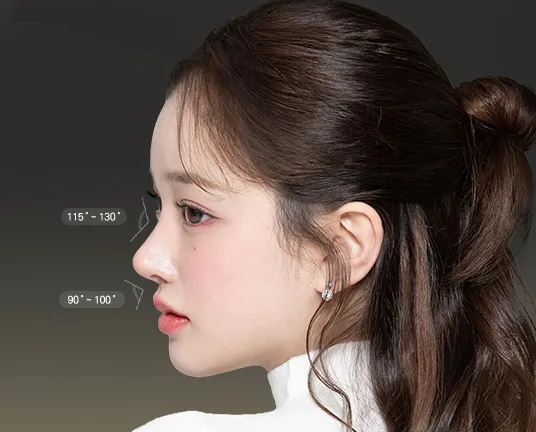
Every nose shape is different. The same is true of every face. When undergoing rhinoplasty, the goal is not simply a pretty nose, but a nose that is beautiful and harmonious with your own face.
JT helps you find the ideal nose by considering nasal height, line, shape, angle, and proportions.
Point ❸ Thorough Safety Above All!
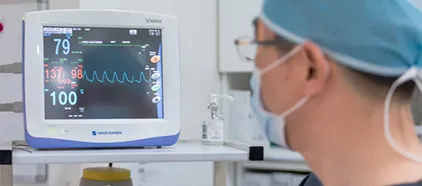
* Emergency kit, cardiac defibrillator, UPS, and airway intubation system available
For safe surgery, we conduct systematic comprehensive preoperative examinations and are equipped with advanced equipment to respond to emergencies.
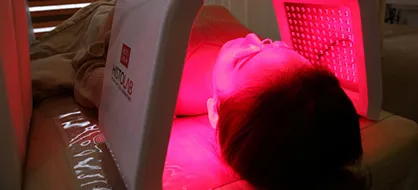
Responsible postoperative care
Postoperative care programs, including swelling injections, laser treatments, and prescription medications, are available. Continue receiving one-on-one care from the same attending physician after surgery. If follow-up assessment by your attending physician is needed, we can assist with scheduling an appointment.
JT Rhinoplasty Materials
Because every individual’s nasal condition differs, ideal rhinoplasty requires using the Implant and materials most suitable for you.
Rhinoplasty Biological Tissues
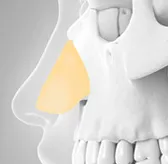
Septal Cartilage
Septal Cartilage inside the nose has appropriate thickness and strength, making it suitable as a strut for elevating the nasal tip.
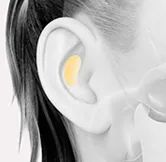
Ear Cartilage
Cartilage from inside the ear is used to shape the Nasal Bridge/nasal tip area
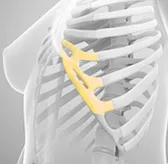
Autologous Rib Cartilage
Cartilage is harvested from the end of the rib; because it is strong, it can provide more powerful support to elevate the nose.
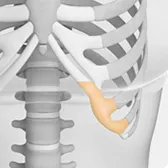
Donor Rib Cartilage
This is Rib Cartilage from another person that has been processed to prevent an immune reaction. It can be conveniently used without a separate harvesting procedure.
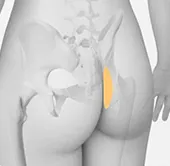
Autologous Dermis
This is autologous dermis harvested from the groin or coccyx area, used when the skin of the nasal dorsum is thin or nasal Soft Tissue is insufficient.
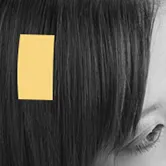
Autologous Fascia
This refers to the thin membrane surrounding muscle; the temporalis fascia located mainly in the scalp above the ear or temple area is used.
Nasal Bridge Implants
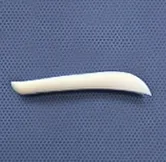
Silicone implant
The most commonly used material, recognized by the U.S. FDA as one of the safest materials.
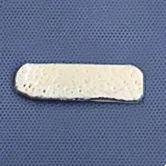
AlloDerm
A dermal graft tissue for transplantation made by removing cellular components that may cause immune reactions from the dermal layer of another person’s skin, leaving only the tissue structure composed of collagen and elastic fibers.
JT Plastic Surgery uses only biological tissues and Implants whose safety and efficacy have been confirmed through domestic and international academic societies and publications, and that have been certified by credible institutions such as CE, the FDA, and the Ministry of Food and Drug Safety.
 JT PLASTIC SURGERY
Medical Staffs
 Consultation SpecialistMIJUNG
20
AI Review Summary
Clear and detailed explanation of procedures
Minor feedback regarding duration
Responsive and professional communication
Positive overall consultation experience
很好的医生,非常温柔。我咨询的问题都很好的回答了,还提出建议
Clear explanationDetailed consultation是一个女医生 咨询回复都很耐心温柔~ 给的方案也挺专业的 不过具体的细节还是需要线下去面诊才能确定
Clear explanationHonest feedback協助諮詢的姐姐人超級好!💖對我想做的鼻部整形手術解說的很詳細,諮詢時間把握的很好,手術相關問題都有被很好的解答
Clear explanationEasy to understand很棒,醫師很親切,有問題都可以很好的回答
Clear explanationPersonalized advice